Templot Club Archive 2007-2020
|
|||
| author | remove search highlighting | ||
|---|---|---|---|
|
posted: 17 May 2011 02:13 from: Martin Wynne
click the date to link to this post click member name to view archived images |
This topic is about the new real > platforms ... menu item. |
||
|
posted: 22 May 2011 11:51 from: Paul Boyd
click the date to link to this post click member name to view archived images |
A remarkably quiet topic for a very useful function - I've tried it, and it works! I had a platform line made up of three separate templates so added the platform to each. I like the feature where you can turn off the start and end lines as it means that the resulting platform is one continuous run rather than three separate pieces. I can see many uses for this, not just platforms 105_220650_190000000.png 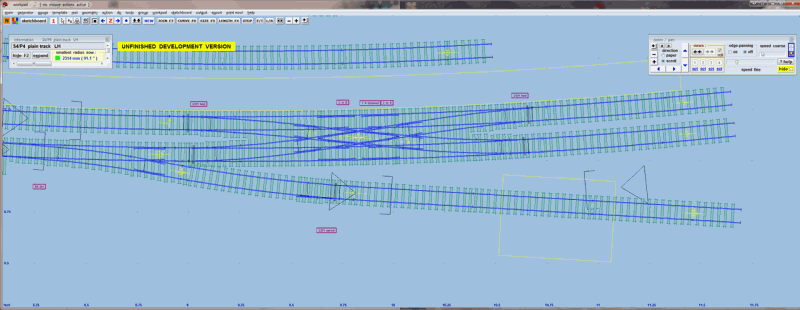 |
||
|
posted: 22 May 2011 12:06 from: Phil O
click the date to link to this post click member name to view archived images |
Hi Martin I have just used this feature and like Paul I can turn of the start and end lines but when I turn off the rear line it still remains in place. 38_220705_050000000.png 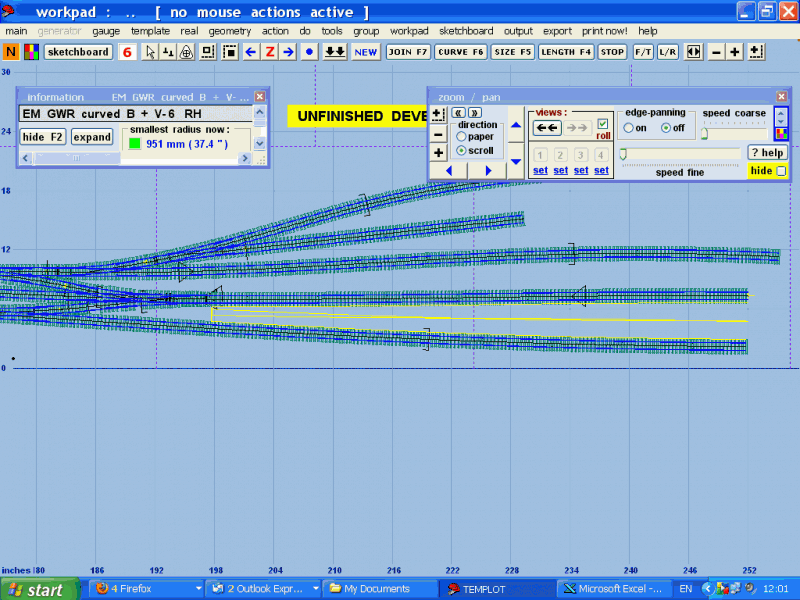 Cheers Phil |
||
|
posted: 22 May 2011 12:20 from: Paul Boyd
click the date to link to this post click member name to view archived images |
Hi Martin Phil's right. On my system, the rear line changes to a dashed line when selected, but stays dashed when stored. It looks like Phil may have a solid line, but I'm not sure. The dashed line is clearer in the full-size image in the image gallery. 105_220718_530000000.png 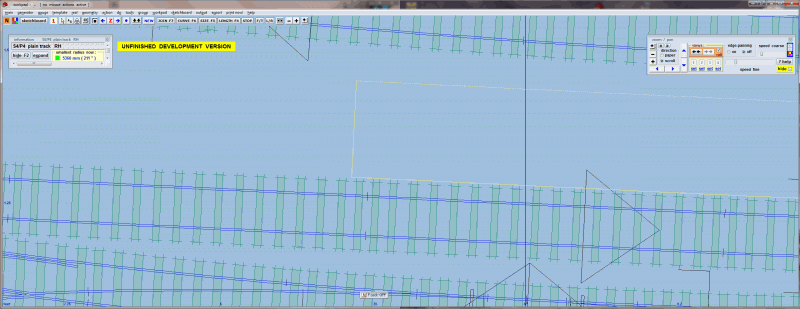 |
||
|
posted: posted: 22 May 2011 12:28 from: Phil O
click the date to link to this post click member name to view archived images |
Paul Boyd wrote: Hi MartinOn closer inspection the rear line is dashed. Phil |
||
|
22 May 2011 12:28 from: Martin Wynne
click the date to link to this post click member name to view archived images |
Phil O wrote: I have just used this feature and like Paul I can turn of the start and end lines but when I turn off the rear line it still remains in place.Hi Paul, Phil, Glad you like them, but platforms are still on the work-in-progress list. On the workpad, platform edges which are set not to show should appear as dotted outlines. They don't yet in all cases. They disappear entirely only on the printed/sketchboard output, which also then has a solid or hatched platform infill colour. But none of that is yet working properly. If you experiment with printing platforms, do it at a small scale to avoid wasting ink. regards, Martin. |
||
|
posted: 22 May 2011 17:01 from: Paul Boyd
click the date to link to this post click member name to view archived images |
Oops - I forgot to re-read the work-in-progress list - sorry! What I have noticed though is that as it stands now, platforms block out timber numbering when printing. Is it your intention to have timber numbers visible in the final version? As an aside, it would be quite nice if it was possible to swap timber numbers to the opposite end of the timbers for individual templates when printing as sometimes they can get a bit crowded and confused. I would imagine that this isn't a trivial job though - apart from anything else the timber "reference end" would get confused! If this suggestion gets onto your to-do list at all, stick it somewhere near the bottom |
||
|
posted: 22 May 2011 18:33 from: Martin Wynne
click the date to link to this post click member name to view archived images |
Paul Boyd wrote: Oops - I forgot to re-read the work-in-progress list - sorry! What I have noticed though is that as it stands now, platforms block out timber numbering when printing. Is it your intention to have timber numbers visible in the final version?Hi Paul, Yes, I'm aware of the problem with the timber numbering. In theory putting the numbers on top should be straightforward, but in fact it means changing quite a lot of complex code. The numbers are on the timbering layer and the platforms are on the rails layer. Putting the numbers on top would mean creating a third layer. The immediate partial solution is to change the platform infill from solid to hatched or cross-hatched style. The numbers are then still mostly still readable through the hatching. If you want to try it, at present the platforms use the same infill style as the timbers, but I'm planning to give them their own settings. In practice, the cross-hatching density varies with different printers, so this approach may work better on some printers than others. It does save a lot of ink. As an aside, it would be quite nice if it was possible to swap timber numbers to the opposite end of the timbers for individual templates when printing as sometimes they can get a bit crowded and confused. I would imagine that this isn't a trivial job though - apart from anything else the timber "reference end" would get confused! If this suggestion gets onto your to-do list at all, stick it somewhere near the bottomThat wouldn't be too difficult to do on the print output, I will look into it at some stage. Since you rarely have platforms on both sides of an individual track, it would solve the previous problem also. But it's a no-no on the workpad, otherwise the timber shoving code is going to be well and truly broken and need a lot of additional work. The numbers are clicked on to select a timber for shoving. regards, Martin. |
||
|
posted: 22 May 2011 22:32 from: Paul Boyd
click the date to link to this post click member name to view archived images |
Hi MartinBut it's a no-no on the workpad, otherwise the timber shoving code is going to be well and truly broken and need a lot of additional work. The numbers are clicked on to select a timber for shoving.I thought that would be the case. You'd never know which end you were working from when lengthening or shortening the timbers, for instance, or which end is in-line! Anyway, it was a semi-random thought that's crosse my mind in the past! |
||
|
posted: 29 May 2011 00:58 from: Brian Nicholls
click the date to link to this post click member name to view archived images |
Hi Martin, So far, I’ve had a very good evening Temploting using the TDV. I decided to have ago at Platforms, and WoW, what a brilliant addition this is to Templot. I spent several hours going round my New Street templates constructed to date (some 300 +), and added the platforms where applicable. I did this exercise initially to check the DXF export function, with the idea, which I think I’ve mentioned before, to be able to load the DXF files into Autocad and then redraw the station platforms and buildings around the rails of the templates, that way I get exactly an accurate drawing of the layout and can add items as required. The DXF export, worked perfectly for an “Non-platform” version of the rail layout to date, when I did the same for the platform version (platform edges added) again the DXF was good, with one exception and that was, there was a large red rectangle around the whole thing with a red cross going from corner to corner, just as if it had been crossed out in a box. Any ideas why this might be ? As an incidental, it really does not matter too much about the “cross-out”, I could still successfully draw the station from the file anyhow. I have attached one of the DXF files with the re cross showing, sorry can’t attach the non platform version it’s 7.48 MB in size. Regarding the platform testing, as I stated, I thought this was superb and appeared to work really well, but again with one exception, I found that when the platform needed to follow the curvature of the turnout side of a turnout, for some reason it kept going straight on and cut across the rails of the turnout. See attached screenshot below for detail. I found that this was the case wherever a turnout was met and the turnout side was against the platform edge. When the platform edge was needed against the main road side of the turnout, then that was perfectly OK and it matched the curvature perfectly. So, is this a bug ? All the best, Brian Nicholls. 1853_281936_170000000.gif 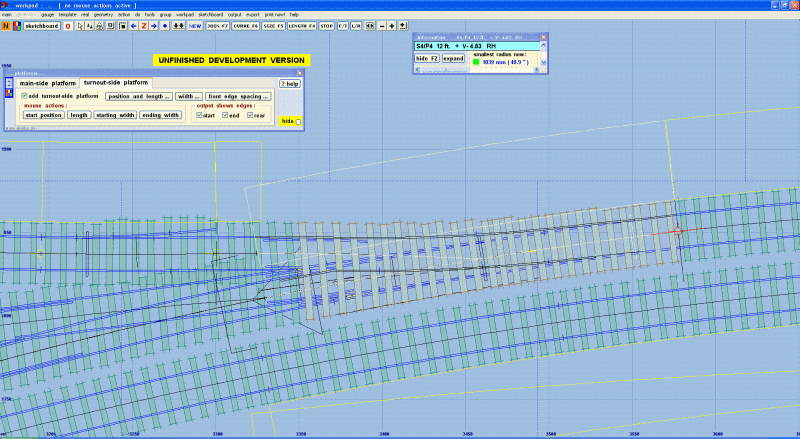 |
||
| Attachment: attach_1085_1488_New_Street_Station_1921_GSNC-CR_492scale_EVZ-TDV_P2.dxf 338 | |||
|
posted: 29 May 2011 02:04 from: Martin Wynne
click the date to link to this post click member name to view archived images |
Hi Brian, That's a very impressive DXF. The red rectangle is your background picture shape. To remove it from the DXF, either don't load the BGS file before exporting the DXF, or in the DXF dialog set the colour for picture shapes to none: 2_282037_000000000.png 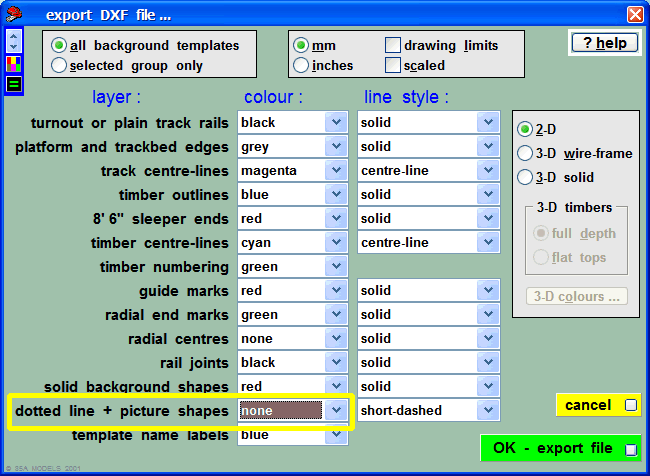 You can remove other items from the DXF by the same means. The platforms are still a work-in-progress. Platforms following the turnout-side of a turnout are not very common. I may add that or I may not -- it could get messy. The intention at present is that the turnout-side platforms are for the approach or exit plain track sections of the template, if any. But provided the turnout is not on a transition curve or slewed, you can do this: In Normal mode: 1. copy the turnout to the control template (don't delete it). 2. put the peg at CTRL-1 (or anywhere except CTRL-0). 3. click do > approach/plain track > snap approach to EGTP menu item. (External Geometrical Tangent Position) 4. click tools > make split > make plain track turnout road > on external geometrical radius menu item. 5. click geometry > track centre-lines only menu item. 6. click real > platforms ... menu item to add the platform as required. 7. store & background. If the turnout is on a transition or slewed, you can overlay a bit of plain track manually for best fit. regards, Martin. |
||
|
posted: 29 May 2011 14:26 from: Brian Nicholls
click the date to link to this post click member name to view archived images |
Hi Martin, Many thanks for the response. Yes the DXF is quite large, and will be getting much larger as I still have the other side of the station to do, and that side has more complex formations that the London end and is more spread out. This is because of the two tunnel systems at that end, one tunnel to Wolverhampton, and the other tunnel for the Bristol route. I don’t know if you noticed in my DXF, I had removed some of the un-necessary lines and features that I would not use in Autocad, but I did not notice, or bother with, the dotted line + picture shapes as I did not have the main background plan in view, this had been hidden. But many thanks for the tip. I must admit I did suspect that it would be difficult to do the platform on the turnout side of a turnout, however, so long as we can work around it, as you have suggested we should get by. I suppose, one could also take the drastic step of re-doing the turnout and changing hand, provided, that the platform is only on the one side of the turnout. In the case where a platform is on both sides of a turnout (a very rare animal) then you are snookered, and have to do as you suggest. As you can imagine, the platform on the turnout side, or in some rare cases both, mainly occur in sidings and loading areas, in the case of my example, this was a siding to a carriage landing area of the station, and I do have other such sidings on the other side of the station known as the fish sidings, yet to be done. I will press on with investigating the platform feature, since my exercise yesterday was mainly to see if I could produce a viable DXF file for Autocad, which I might add, it did (absolutely great). I did use the ‘length’ function in platform, but did not use any other functions, will give those a tryout today and see what goodies they produce. Many thanks again for the help and guidance. All the best, Brian Nicholls. |
||
|
posted: 1 Nov 2011 14:34 from: Martin Wynne
click the date to link to this post click member name to view archived images |
Gordon S wrote: I've been trying to work through the platform menu, but cannot get the hang of it at all. Any chance you could run a quick tutorial, so I can do it myself?Hi Gordon, I'm a bit pushed for time today, I will try to make a bit of video this evening. Where you have a platform between two tracks, the idea is that you add a platform to both of them, and adjust the platform widths so that they overlap. Then set the rear edges not to show, for a neat result. Make one of the tracks the control template. real > platforms... menu item. Click the tab for main-side platform or the tab for turnout-side platform as required. The main-side of a template is the side where the numbers appear -- workpad > pad options for the control template > show timber numbers menu option. The turnout-side is the opposite side. Assuming you are adding a platform on the main side, tick the box for add main-side platform. A platform will appear on the template, and the buttons and controls to adjust it will appear on the dialog. Try playing with the buttons in the mouse actions: panel. I'm sure you will soon get the hang of it. store & background when finished. I'm sorry, I'm now being called away from the computer. Martin. |
||
|
posted: 1 Nov 2011 15:22 from: Gordon S click the date to link to this post click member name to view archived images |
Thanks Martin. All is clear now. What a dope... I was trying to use the several pieces of track at once without 'deleting to the control'. Of course that meant the platform wasn't showing anywhere. As soon as I chose one piece of track, all became clear. |
||
|
posted: 1 Nov 2011 19:57 from: Gordon S click the date to link to this post click member name to view archived images |
OK. I'm now starting to get a shape, but how do you delete a shape you don't want without deleting the piece of track? Looks good, Martin. A very useful addition. |
||
| Last edited on 1 Nov 2011 19:58 by Gordon S |
|||
|
posted: 1 Nov 2011 20:56 from: Martin Wynne
click the date to link to this post click member name to view archived images |
Gordon S wrote: how do you delete a shape you don't want without deleting the piece of track?Hi Gordon, Untick the box for add main-side platform, or untick the box for add turnout-side platform, as the case may be. Martin. |
||
|
posted: 1 Nov 2011 21:23 from: Gordon S click the date to link to this post click member name to view archived images |
Easy when you know how...Spent ages looking for a delete button. Thanks. |
||
|
posted: 2 Nov 2011 22:02 from: Gordon S click the date to link to this post click member name to view archived images |
Hi Martin, another rough sketch in it's most basic form. I've managed to add the platforms, but cannot seem to adjust both ends of the platform for length. I thought it may be related to the peg position, so tried moving that, but it made no difference. Am I missing something or is this a bug? One end will move with the mouse, the other won't. Moving the storage roads over the stairwell now allows scenic work on three sides. Still a lot to do, but it is an improvement. 479_021700_230000000.png 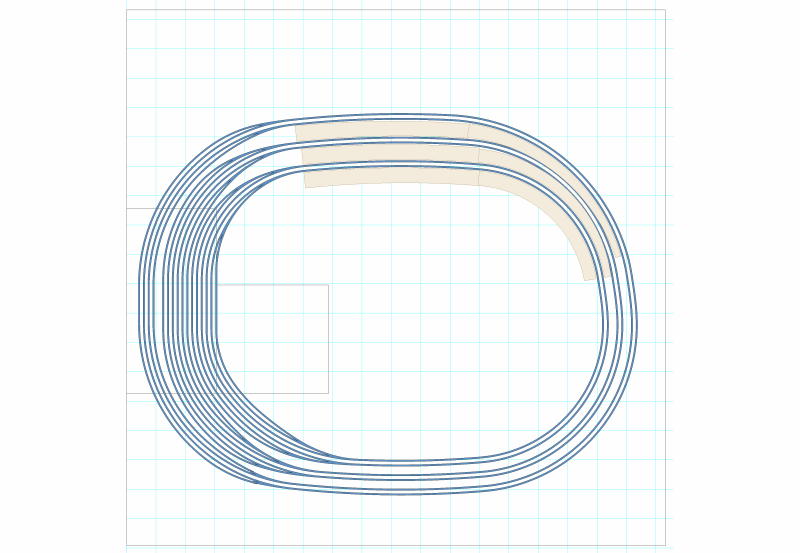 |
||
| Attachment: attach_1227_1488_22_-_ET-_Reduced_station_9.box 354 | |||
|
posted: 3 Nov 2011 11:07 from: Martin Wynne
click the date to link to this post click member name to view archived images |
Gordon S wrote: I've managed to add the platforms, but cannot seem to adjust both ends of the platform for length. I thought it may be related to the peg position, so tried moving that, but it made no difference. Am I missing something or is this a bug? One end will move with the mouse, the other won't.Hi Gordon, It may be a bug. Can you describe exactly what you did and what did or didn't happen? The platforms are dimensioned similarly to the transition zones and slews. One dimension sets the starting point for the platform, measured from the CTRL-0 datum end of the template. The actual peg position is immaterial. The other dimension sets the length of the platform: 2_030552_450000000.png 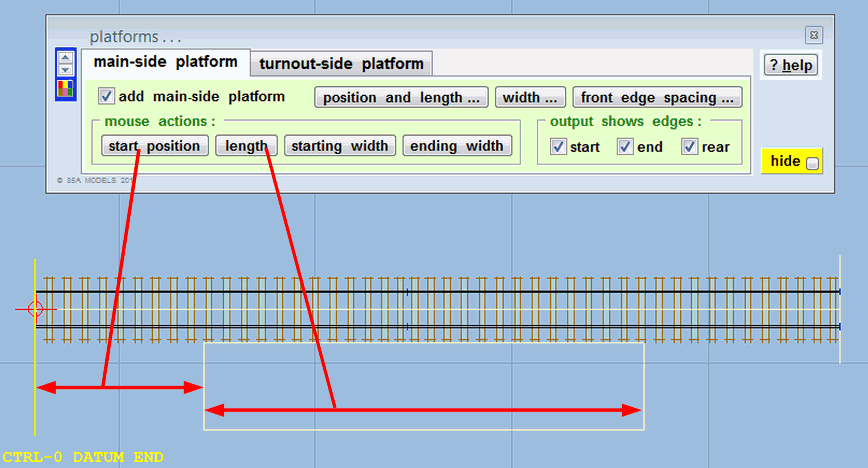 Unlike transitions and slews, a platform cannot extend beyond the length of the template. This may be why you find them not changing when you use the mouse action. Try setting the dimensions directly via the position and length... button above. If you enter the pre-sets (/ slash key), the platform will reset to just fill the template length. You can then try using the mouse actions again. regards, Martin. |
||
|
posted: 3 Nov 2011 12:23 from: Gordon S click the date to link to this post click member name to view archived images |
If you open the attached file and then take the inner platform on the right hand side, you should be able to see what I mean. Using real-platforms and mouse action-length you will see you can shorten the inner platform from the left hand end, but cannot shorten the platform at the right hand end. 479_030723_010000000.png 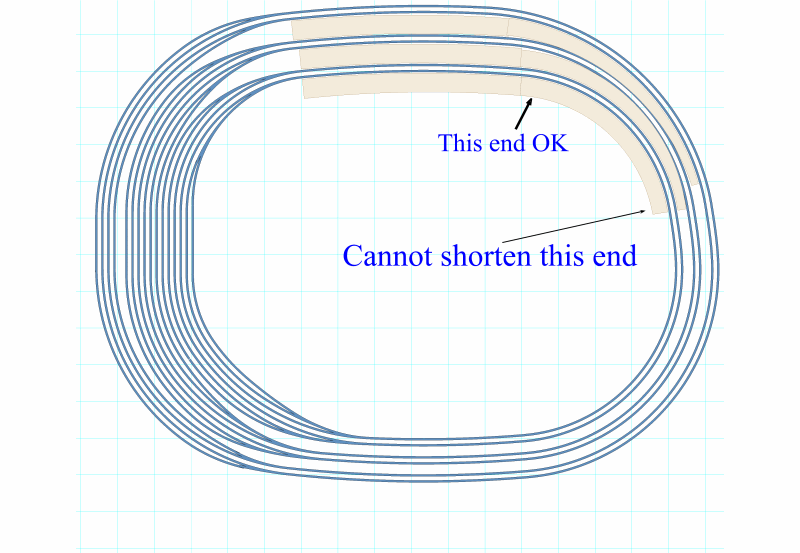 |
||
|
posted: 3 Nov 2011 13:04 from: Martin Wynne
click the date to link to this post click member name to view archived images |
Hi Gordon, Working OK here. That's the CTRL-0 datum end of the template on the right, so the platform starts there. Clicking the mouse actions: start position button works fine for me, and adjusts the starting position of the platform upwards. A platform cannot exceed the template length, so the platform shortens accordingly to finish at the top template boundary. If still not working for you, it must be a bug. Anything else funny happening? regards, Martin. |
||
|
posted: 4 Nov 2011 14:41 from: Gordon S click the date to link to this post click member name to view archived images |
Thanks Martin. It is OK, just my lack of understanding/experience on a new option. | ||
| Last edited on 4 Nov 2011 14:42 by Gordon S |
|||
|
posted: 4 Nov 2011 16:58 from: Martin Wynne
click the date to link to this post click member name to view archived images |
Gordon S wrote: Thanks Martin. It is OK, just my lack of understanding/experience on a new option.Hi Gordon, I'm glad you sorted it out. That's the one problem with a Development Version -- until the help texts are written the new features tend to be a bit of mystery to use. You have obviously mastered the sketchboard very well. http://yourmodelrailway.net/view_topic.php?id=4674&forum_id=21&jump_to=172224#p172224 Martin. |
||
|
posted: 22 Dec 2011 13:16 from: richard_t
click the date to link to this post click member name to view archived images |
Hello I've exported a plan with platforms to DXF format and some of the platform edges are missing from the DXF - those perpendicular to the rails: 499_220815_530000000.png 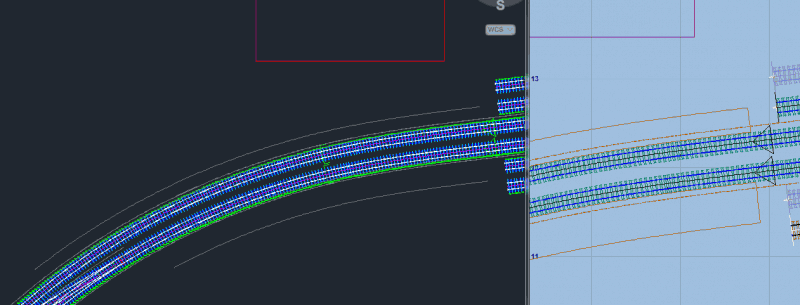 Not a biggie for me, I can just add them in, but I thought it worth mentioning. Richard. |
||
| Please read this important note about copyright: Unless stated otherwise, all the files submitted to this web site are copyright and the property of the respective contributor. You are welcome to use them for your own personal non-commercial purposes, and in your messages on this web site. If you want to publish any of this material elsewhere or use it commercially, you must first obtain the owner's permission to do so. |