Templot Club Archive 2007-2020
|
|||
| author | remove search highlighting | ||
|---|---|---|---|
|
posted: 18 Nov 2011 21:17 from: Brian Nicholls
click the date to link to this post click member name to view archived images |
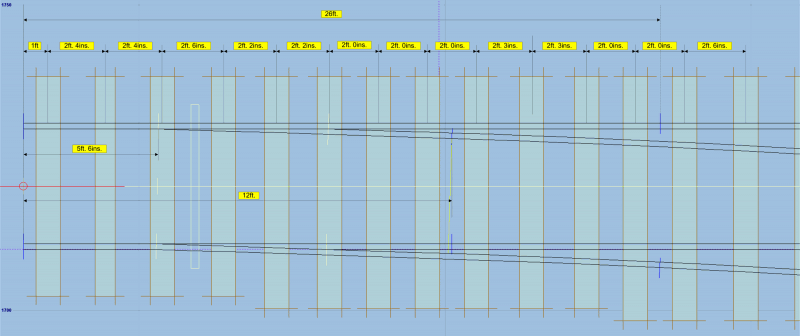
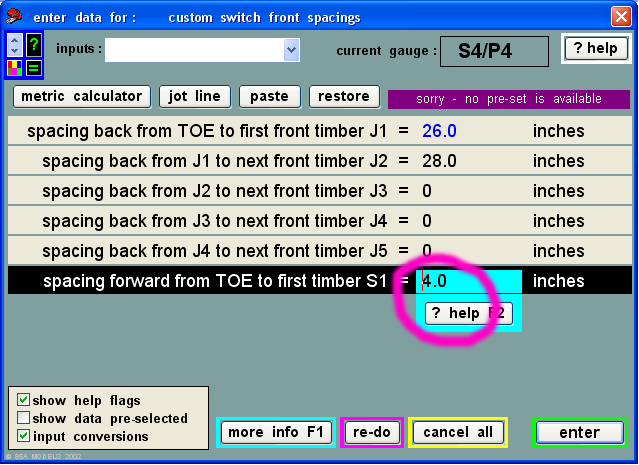
Hi Martin, I have a slight problem with the data of a custom switch, which is bugging me and I don’t know what’s causing it. The problem is as follows: I was making an LNWR 12ft straight heel custom switch from scratch, i.e. not copying a similar template into the slot, having completed the whole input sequence, when I checked the timber spacing using the shove timbers menu, I found that the S1 timber was backward (as in the custom menu dialog) by 2ins. and the centre line was in-line with the toe (blade front tip) of the switch, where the centre line of the timber should have been some 2ins. forward (as in the custom menu dialog) of the toe. Also the centre line spacing between the S1 and J1 timbers was wrong being, 2ft 2ins, instead of 2ft 4ins, which consequently put all the following timbers along the switch out, in a backward position, by the same amount, although the individual spacing between the following timbers was correct. In addition the position dimension of the S1 timber from the stock rail front joint was showing 66ins. Instead of 68ins as the drawing indicated. I tried this a couple of times, with the same result. At this point I refer you to the two included images below, one is the dimension details of the switch as taken from an original LNWR drawing, the other image is of the custom switch front spacings menu. I then tried changing the spacing forward from TOE to first timber S1 dimension from, 2ins (calculation for this shown below) to 4ins. (the default setting), then went through the process, but this time when I re-checked, all the switch timber positions and spacings came out correct. See magenta circle on attached image below. Now I feel I must be doing something wrong because, as I understand it, this is a tried and tested part of the program, but I cannot see what. For detail of the calculation of the TOE to centre of S1 timber is: Dimension from front joint to TOE (from drawing) is 5ft 6ins = 66ins. Dimension from front joint to centre of S1 timber is (1ft + 2ft 4ins. + 2ft 4ins.) = 5ft 8ins. = 68ins. Now dimension for spacing forward from TOE to first timber S1 is (68ins. – 66ins.) = 2ins. (not 4ins.). Please restore my sanity, not having a good day. All the best, Brian Nicholls. 1853_181614_150000000.png  1853_181615_050000000.png  |
||
|
posted: 18 Nov 2011 21:39 from: Martin Wynne
click the date to link to this post click member name to view archived images |
Hi Brian, Sorry you are struggling, although I'm having some difficulty following what you are saying. If the dimensions do not come out as intended, the most likely reason is that you have some timber shoving applied. Go to the shove timbers dialog and click the restore all button. If that doesn't fix it, please tabulate here, or attach a drawing, showing what you want the spacing dimensions to be (not what you actually achieved -- I'm finding it difficult to disentangle the two in your message), and I will try it myself and see what happens. I don't need the rail dimensions. regards, Martin. |
||
|
posted: 19 Nov 2011 16:42 from: Brian Nicholls
click the date to link to this post click member name to view archived images |
Martin Wynne wrote: Sorry you are struggling, although I'm having some difficulty following what you are saying. Hi Martin, Thanks for the very prompt response, apologies for not doing likewise, but had to attend to family matters immediately after posting my message, and did not get back to the PC until too late to do anything. I think you are being kind when you use the word “struggling”, but this really was not the case, I think confused as to what was happening to the one particular template. As I have stated in previous messages, I have produced about a dozen or so custom templates with no problems at all. Anyhow, to business, you were right in your assumption that timber shoving may be the problem, it turned out that it was the root cause, however, there is a wrinkle which added to the confusion, I shall now explain. By carrying out several experiments, I discovered, if you make or copy a turnout template that has any one of the switch area timbers manually shoved, then you try to overlay (replace it with) a new switch setting, then the new switch setting will replace the original switch setting, but also the timber or timbers that were shoved will take up a position equal to the shoved amount in addition to the new switch setting. Now it is true, that by then using the restore all button, those shoved timbers will return back to the position dictated by the new switch settings. However, here’s the wrinkle, when you first replace with the new switch setting (and the shoved timbers having taken up their new unwanted positions), the restore all button is greyed out (not active). To get the restore all button active, you just simply have to shove any timber on the template, and then when you click the restore all button, the timbers will take up the position required by the new switch settings, including the one you deliberately shoved to get the button active. This is where I was going wrong, because the restore all button was initially greyed out and I could not get the new switch setting in place, also I was not aware that the timber shoving was added onto any new switch settings, I simply thought that the new switch would completely replace the old settings. So I think with a hint from you Martin and a bit of trial and error on my part my problem is resolved. You can simply repeat this scenario as follows: 1. Make a new or copy a template. 2. Shove, say, the S1 timber forward or backward 2ins. 3. Change the switch setting, to say a 12ft switch or some different switch that you know the expected position of the S1 timber. 4. note the S1 timber position (should be 2ins. Out of position in the direction you shoved it). 5. get shove timbers menu, note the restore all button is greyed out. 6. shove any timber on the template. 7. Note the restore all button is now active. 8. click the restore all button and note the S1 timber take up the correct position. One final point, the drawing image I posted along with my message, did have all the correct (required) spacing dimensions of an original LNWR 12ft Straight Heel Switch. Thanks again Martin for the help. All the best, Brian Nicholls. |
||
|
posted: 19 Nov 2011 20:12 from: Martin Wynne
click the date to link to this post click member name to view archived images |
Hi Brian, Thanks for reporting that bug. It seems to have crept in somewhere between 074b and 091c. If there is any timber-shoving present on any timber, the restore all button should always be active. I will get it fixed. Normally there should be no need to shove the position of any switch timbers, because the spacings can be individually set up in the custom switch settings. But the timbers may have been adjusted in other ways -- for example timbers S1 and S2 are often lengthened to carry point levers, rodding cranks or detection gear. So it would not be right to cancel all shoving automatically when changing to a different switch. Regardless of the working of the restore all button, if the show all shoved timbers box is ticked, any timbers which have been shoved should be showing coloured blue while the timber shoving dialog is visible. regards, Martin. |
||
|
posted: 19 Nov 2011 23:06 from: Martin Wynne
click the date to link to this post click member name to view archived images |
I wrote:If there is any timber-shoving present on any timber, the restore all button should always be active.Well yes and no. It wasn't really a bug. It's always the words which trip me up. The word all doesn't make logical sense if there is only one shoved timber. So I coded the restore all button to be active only if there is more than one shoved timber. If there is only one, you can restore it by selecting the timber and clicking the restore timber button instead. I have now changed the restore all button so that it is active even if there is only one shoved timber present. In the next TDV update. regards, Martin. |
||
| Last edited on 19 Nov 2011 23:07 by Martin Wynne |
|||
| Please read this important note about copyright: Unless stated otherwise, all the files submitted to this web site are copyright and the property of the respective contributor. You are welcome to use them for your own personal non-commercial purposes, and in your messages on this web site. If you want to publish any of this material elsewhere or use it commercially, you must first obtain the owner's permission to do so. |