Templot Club Archive 2007-2020
|
|||
| author | remove search highlighting | ||
|---|---|---|---|
|
posted: 17 Sep 2012 22:20 from: julia click the date to link to this post click member name to view archived images |
I have an image of the station plan I want to build, it's a photo of a 1907 county series map. But I am now entirely stumped as to how to take this forward into templot. Being a moron I forgot include anything by way of a scale for the image when I took the photo. Is that going to cause me a problem? Where do I start? J |
||
|
posted: 17 Sep 2012 23:19 from: Martin Wynne
click the date to link to this post click member name to view archived images |
julia wrote: I have an image of the station plan I want to build, it's a photo of a 1907 county series map.Hi Julia, Is it possible to scan the map rather than use a photograph of it? If it is scanned at a known resolution Templot can do all the scaling for you. If not, it would help if you upload the photo here so that we can see what we are dealing with. Usually there is a scalebar on a map, or something on the map of known dimensions, and ideally the OS grid or margin data. What modelling scale are you using? regards, Martin. |
||
|
posted: 17 Sep 2012 23:30 from: julia click the date to link to this post click member name to view archived images |
Martin Wynne wrote: Hi Julia, I am modelling in 00. The image is attached. Could the gap between the tracks be a workable scale? J |
||
| Attachment: attach_1502_2058_IMAG0849.jpg 559 | |||
|
posted: 17 Sep 2012 23:45 from: Martin Wynne
click the date to link to this post click member name to view archived images |
Hi Julia, That's an excellent map for use as a picture shape, thanks for uploading. We can probably establish the scale by getting the distance from the river bridge to the regards, Martin. |
||
| Last edited on 17 Sep 2012 23:50 by Martin Wynne |
|||
|
posted: 18 Sep 2012 00:37 from: Tony W
click the date to link to this post click member name to view archived images |
Hi Julia. In the abscence of better info, your image is 72 DPI and approx 600:1 scale. Tony. |
||
|
posted: 18 Sep 2012 00:57 from: Martin Wynne
click the date to link to this post click member name to view archived images |
Tony W wrote: Hi Julia.Hi Tony, As far as Templot is concerned that is exactly the same as 300 dpi and 1:2500, the default settings for scanned 25" OS maps. ( 72 dpi x 2500 / 600 = 300 dpi ) Which is surprising because Julia says it was photographed, not scanned. regards, Martin. |
||
|
posted: 18 Sep 2012 01:42 from: Paul
click the date to link to this post click member name to view archived images |
Hi Julia Without putting to simple a bent on it, as Martin says it is a fine picture, I would simply load it straight in. new(dialogue box), picture (radio button), add clicked shape From there I would use mouse actions shift and scale to manipulate it to a size comparable to a straight length of track to match your scale, then get finicky later. cheers paul |
||
|
posted: 18 Sep 2012 01:57 from: Martin Wynne
click the date to link to this post click member name to view archived images |
Paul wrote: From there I would use mouse actions shift and scale to manipulate it to a size comparable to a straight length of track to match your scale, then get finicky later.Hi Paul, There's no need for that because clicking scanned prototype map, entering 300dpi and 1:2500 appears to produce a spot-on result, as Tony suggested. But remember to set the 4mm scale for 00 first Julia. It's a bit puzzling because a camera photograph of a map wouldn't normally produce such round-figure numbers. regards, Martin. |
||
|
posted: 9 Nov 2012 02:16 from: julia click the date to link to this post click member name to view archived images |
Ok, am I going mad, I can't seem any obvious way to load the image as a background to work from. There is a bewildering array of options, none of which matching the description above: "new(dialogue box), picture (radio button), add clicked shape" What on earth am I doing wrong? J |
||
|
posted: 10 Nov 2012 11:44 from: David Higgs
click the date to link to this post click member name to view archived images |
Juilia, I asked a similar question here:- topic 1278 - message 7858 |
||
| Last edited on 10 Nov 2012 11:45 by David Higgs |
|||
|
posted: 10 Nov 2012 12:01 from: Martin Wynne
click the date to link to this post click member name to view archived images |
David Higgs wrote: Juilia,Hi David, Thanks for posting that. I have just edited my reply there to update it for Templot2. The video is out of date for Templot2 and needs some re-working. There are new functions to lock the image to the notch or spacing ring when scaling it to size, and a new straightening function to use before the wrapping function. Also, the background shapes dialog has been tidied up. I will try to get a screenshot tutorial for Julia done as soon as possible, but first I need to get work on 206c finished and uploaded. regards, Martin. |
||
|
posted: 12 Nov 2012 15:28 from: phileakins
click the date to link to this post click member name to view archived images |
Should it be of help, there are a number of photo's, together with extract from the 1872 OS map, of Chartham published in the Mitchell and Smith's 'Branch Lines Around Canterbury'. Phil |
||
| Last edited on 12 Nov 2012 15:29 by phileakins |
|||
|
posted: 12 Nov 2012 15:31 from: julia click the date to link to this post click member name to view archived images |
phileakins wrote: Should it be of help, there are a number of photo's, together with extract from the 1872 OS map, of Chartham published in the Mitchell and Smith's 'Branch Lines Around Canterbury'. I have the copy of that from the local library, a very useful book. Thanks J |
||
|
posted: 12 Nov 2012 18:17 from: Martin Wynne
click the date to link to this post click member name to view archived images |
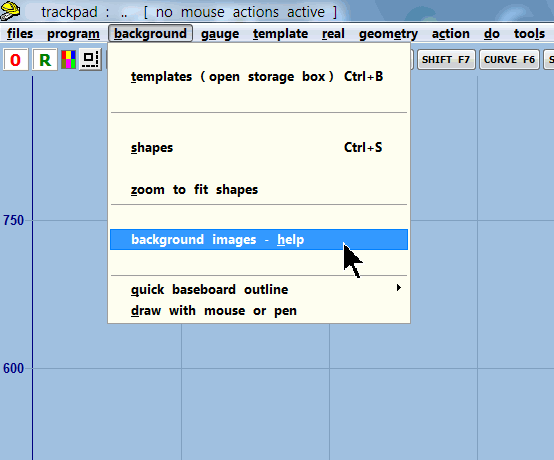
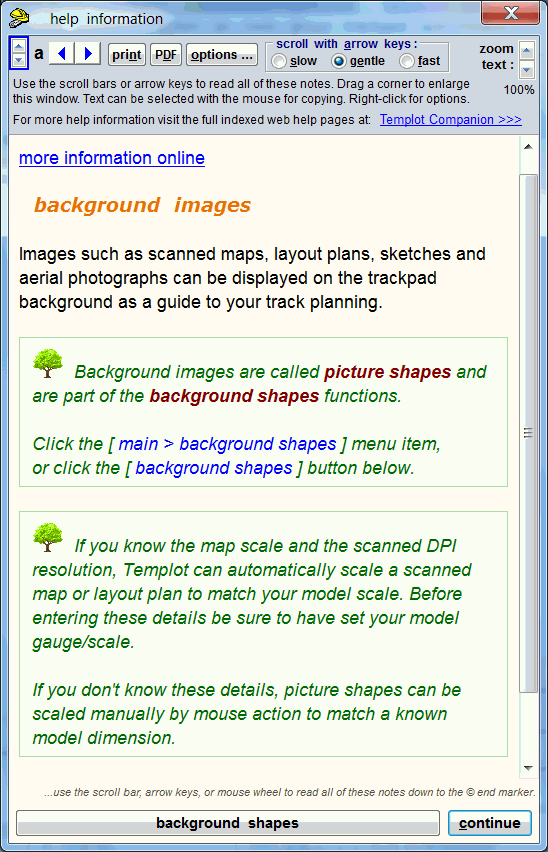
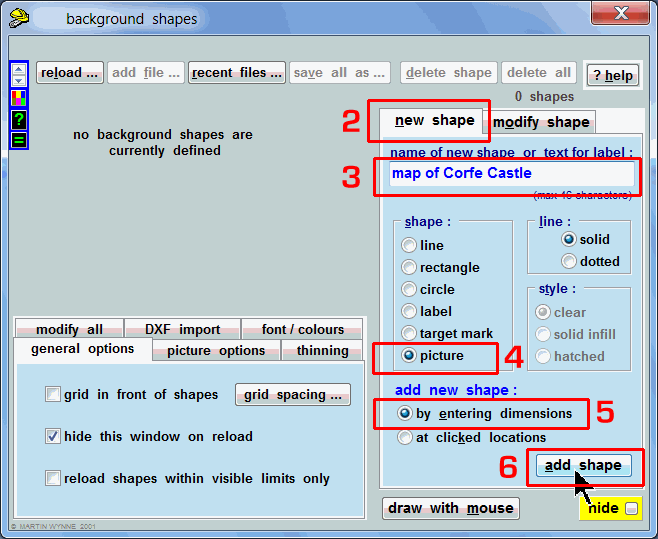
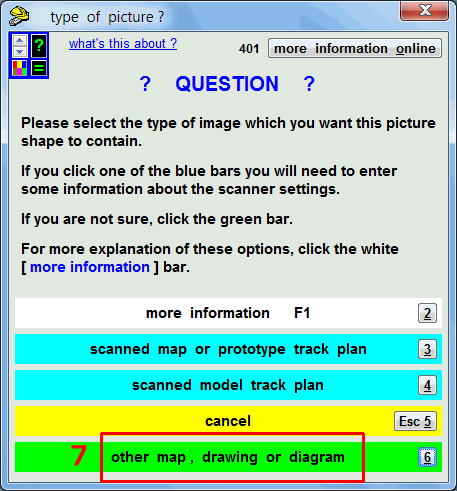
julia wrote: Ok, am I going mad, I can't seem any obvious way to load the image as a background to work from. There is a bewildering array of optionsHere is a brief screenshot tutorial. This is for Templot2 version 213a. Please do not try to follow this if you are still using an earlier version of Templot. • Your model gauge/scale must be set in Templot before you begin. e.g. EM. Don't forget this. 1. Start off by clicking this background > background images - help menu item. 2_160711_100000000.png  You will then see this: 2_131128_200000001.png  Click the background shapes button at the bottom. A background image is called a picture shape. It is comprised of two components: a container rectangle, having specified overall dimensions and a specified position on the trackpad, and a raster (bitmap) image which is stretched to fit inside it. This is loaded from an image file, from a scanner or camera or wherever. It's important to understand these two separate components, because the container rectangle may sometimes appear empty, and it is possible to change the image which it contains without changing its size or position. After clicking the background shapes button, this dialog will appear: 2_121236_080000001.png  2. To add a new shape, first click the new shape tab. 3. Enter a name for the shape, which will appear in the list of shapes. 4. Click the option for the type of shape, in this case a picture shape. 5. Choose whether you want to enter the dimensions for this shape, or have it placed at locations which you previously clicked on the trackpad. Usually for a picture shape you want to enter dimensions. 6. Click the add shape button. 7. Follow the dialogs which appear: 2_160728_060000000.png  First of all, you must know where the image file is saved on your computer and how to navigate to it in a Windows file dialog. I'm sorry if that sounds a bit basic, but I've discovered that many users can't manage that much, relying always on the Windows defaults. I'm afraid I can't provide a Windows primer as part of the Templot tutorials, we have to assume a base starting point somewhere. Secondly, it's preferable if you know the scale of the map, which is usually marked on it somewhere. For example the popular 25" OS maps have a scale of 1:2500. And also that you know the resolution in DPI (dots per inch) at which it was scanned. This information is normally available in your scanning software. Common values are 300 DPI or 600 DPI. Armed with these two pieces of information, Templot can scale the map for you, to match your model scale. If you don't know this information, you will need to scale the map manually by adjusting it with the mouse. Decide whether you have this information now. If you do have this information, click one of the blue bars in the above dialog and follow the instructions. If you don't have this information, click the green bar. You will be asked to enter the required position on the trackpad (you can leave it at 0,0) and the required width in mm which your image represents on your model. If you don't get this exactly right you can scale (re-size, stretch) the picture shape with the mouse afterwards. PLEASE NOTE THAT THIS ABOVE IS FOR VERSION 213a AND WILL CHANGE IN THE NEXT PROGRAM UPDATE. regards, Martin. |
||
|
posted: 12 Nov 2012 18:39 from: julia click the date to link to this post click member name to view archived images |
Martin Wynne wrote: julia wrote:Ok, am I going mad, I can't seem any obvious way to load the image as a background to work from. There is a bewildering array of optionsThis subject comes up time and again. I really can't understand what makes it so difficult. I think I have written this stuff dozens of times, posted screenshots and videos more than once. I think the place I am struggling the most here is due to the fundamental paradigm differences to what I am used to using. I was looking for something along the lines of "import background image" or similar. I didn't expect it to be under a shape. A shape to me is a rectangle or circle or some such, not a background image. This is because I am very new to templot and not entirely familiar with all the basic concepts that it uses. Once knowing that the details are under "Background Shapes" I can start to get somewhere, tho now I need to work out how to take 1:2500 at 300dpi in a 2592x1552 to get the measurements I need. J |
||
|
posted: 12 Nov 2012 18:55 from: Tony W
click the date to link to this post click member name to view archived images |
julia wrote: Ok, am I going mad, I can't seem any obvious way to load the image as a background to work from. There is a bewildering array of options, none of which matching the description above:Hi Julia. Yes, the dialog box has changed, but not drastically. Open the background shapes window as before, "Main > background shapes ctrl + s" then under the "New shapes" tab, click the picture button. Next click the "Add shape" button and select the "Scanned map or protype track plan" option and enter the data as given. Use the X = 0 and Y + 0 options to begin with and then 300 DPI and 2500 to 1 scale. You will then be asked for the file you wish to load and It should work. Tony. |
||
|
posted: 12 Nov 2012 19:01 from: julia click the date to link to this post click member name to view archived images |
Tony W wrote: Hi Julia. That did it, I now have the image in place. That just leaves the hard bit... Thanks all for the help. J |
||
| Please read this important note about copyright: Unless stated otherwise, all the files submitted to this web site are copyright and the property of the respective contributor. You are welcome to use them for your own personal non-commercial purposes, and in your messages on this web site. If you want to publish any of this material elsewhere or use it commercially, you must first obtain the owner's permission to do so. |