Templot Club Archive 2007-2020
|
|||
| author | remove search highlighting | ||
|---|---|---|---|
|
posted: 7 Oct 2012 10:17 from: bambuko
click the date to link to this post click member name to view archived images |
Just downloaded Templot couple of days ago and despite that I am really a CAD type of person, I am picking up the basics really easily. So far it's doing everything I am asking of it The only thing that confuses me is converting from British to American ... I am trying to model PRR tracks in Z gauge using easily available data: 2547_091838_000000000.png 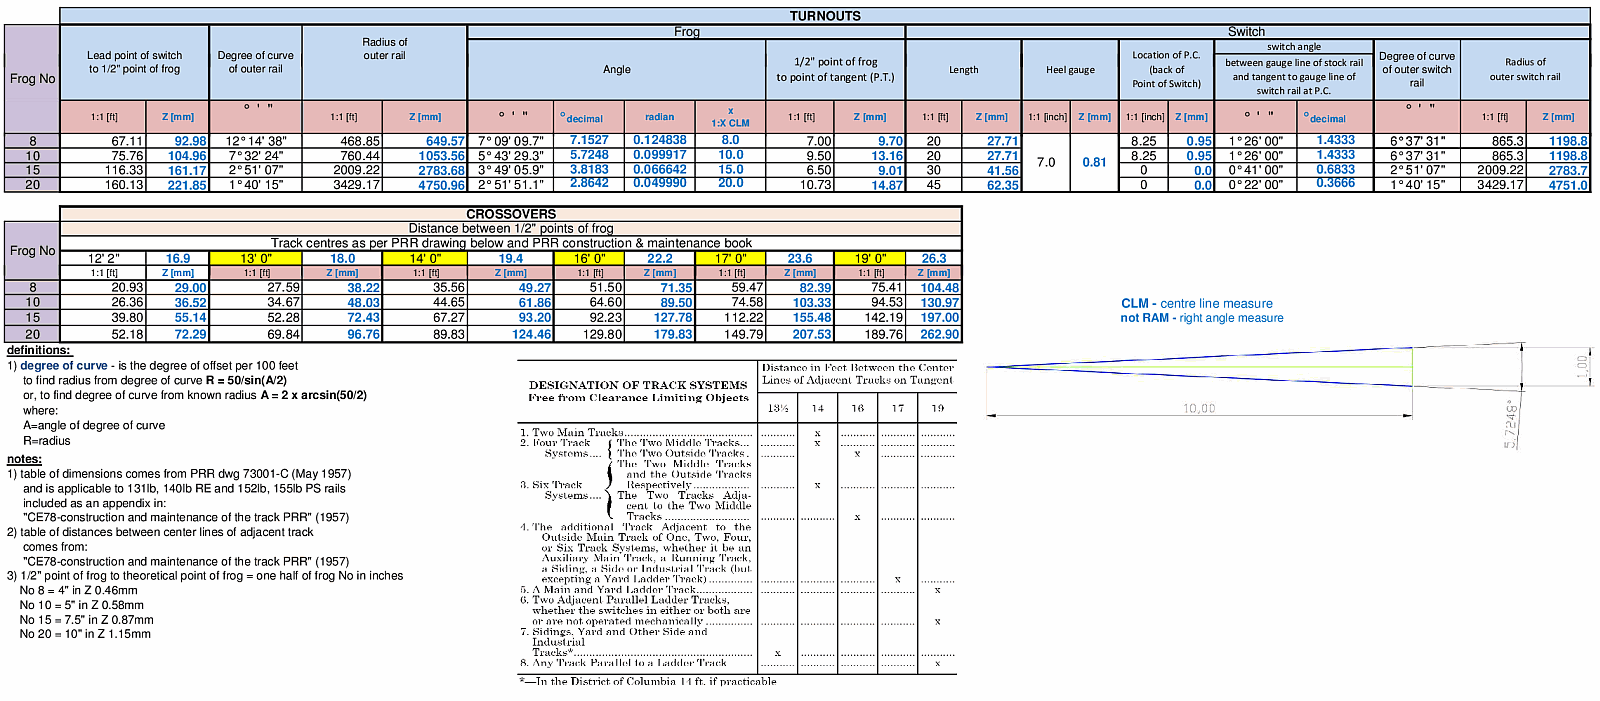 Numbers in black are original (real), in blue are scale (1:220) numbers. My questions are as follows: table.jpg  And here PRR drawing (click to see full size): turnouts%2520etc%2520%2528131-155lbs%2529%2520-%2520dimensions%2520%252873001-C%2529.jpg  I hope you don't mind my questions and I will not be to told to RTFM Thank you Chris |
||
| Last edited on 9 Oct 2012 23:44 by bambuko |
|||
|
posted: 7 Oct 2012 10:52 from: Martin Wynne
click the date to link to this post click member name to view archived images |
bambuko wrote:I hope you don't mind my questions and I will not be to told to RTFMHi Chris, Welcome to Templot Club. We certainly don't mind your questions -- that's what this forum is here for. A full reply to your questions is going to mean quite a lot of writing, so it may take me a while to do that -- please bear with me. In the meantime I'm not going to tell you to RTFM because there isn't one However, if you haven't yet seen it, this page may answer some of your questions: http://www.templot.com/martweb/gs_realtrack.htm You can find some sample H0 US-style templates in Templot to download, here: topic 1335 regards, Martin. |
||
|
posted: 7 Oct 2012 11:08 from: bambuko
click the date to link to this post click member name to view archived images |
Thanks for the welcome Martin Yes I have seen http://www.templot.com/martweb/gs_realtrack.htm and that was going to be my question number 2 I am clear that my turnout is not jogged, but I am only guessing that since the real PRR turnout is talking about "radius of outer rail for the switch" the real turnout is "curved switch" ? Having said so, I am also guessing that (bearing in mind model scale) I might be better off approximating it by using "semi-curved switch"? I have also seen the other message you are referring to (topic 1335 They are good starting point, but I am keen to understand before I use. I will be exporting to CAD to check that Templot turnout is the same as the one I drew in CAD from the numbers I have attached in my message, before I use Templot for more complicated stuff. I am more than happy to wait all the time it will take for you to reply and I appreciate the effort it will involve - thank you Chris |
||
|
posted: 7 Oct 2012 12:48 from: Martin Wynne
click the date to link to this post click member name to view archived images |
Hi Chris, I'm going to answer your questions in stages, because it's a lot for one reply. 1. First of all the most important thing for American users to understand is that in the UK and Templot, a "switch" is only that part of a turnout comprising the moving points. We don't call the whole thing a "switch". Also, a "frog" is normally called a "crossing" or a "common crossing" or a "V-crossing": startup_pad.png  A switch is also sometimes called a "set of points". The design and construction of such track is called "S&C work" or just "S&C" (switches and crossings, not sit and chat Many modellers in the UK (but not railway engineers) often refer to an entire turnout as a "point". It makes no sense, but you will see it frequently on web sites and forums written by modellers. So that's another area of confusion for American users who correctly understand a "point" to be a moving switch rail (switch blade). Ties are called "sleepers" in the UK when they are under plain track. For almost all standard-gauge tracks they are 10" wide and 8ft-6in long (and 5" thick if made of wood). Ties are called "timbers" or "crossing timbers" in the UK when they are under turnouts and other pointwork. They are 12" wide and 6" thick if made of wood. Nowadays they are often made of concrete, and correctly called "bearers", but still commonly called "timbers" and the process of designing the layout of them is called "timbering". For American track ties are usually all the same width, but in Templot you must remember to set the width twice, once for the sleepers and once for the timbers. regards, Martin. |
||
|
posted: 7 Oct 2012 18:17 from: Martin Wynne
click the date to link to this post click member name to view archived images |
2_070534_550000000.png Hi Chris, 2. Templot is not a CAD program in the usual sense, so some of these dimensions can't be directly set as they stand. There is no way to draw a line on the screen and have it converted to track. Templot does the drawing work for you. The usual way to get a full prototypical match is to watch the dimensions showing in the information panel as you adjust the turnout by mouse action, until the desired dimension is obtained. Before that you may need to make some other non-default settings, such as changing to CLM unit angles or changing the blunt nose width. Also it's not unknown for prototype drawings created before the digital age to contain errors, such that it is impossible for two dimensions shown to be reconciled. 2_070542_140000000.png  To answer your specific questions: Q1. The "1/2 point of frog" is called the blunt nose. It is the width of the tip of the vee. In the UK it is not 1/2". For traditional UK bullhead track on non-GWR lines it is 3/4", which is the Templot default. This is the very first change you need to make, because it affects other things including the layout of the timbering: 2_071311_170000001.png 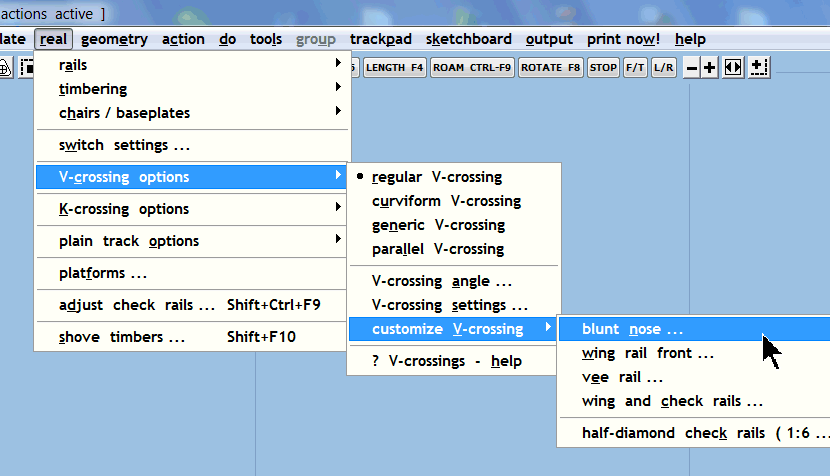 The "theoretical point" is called the fine point (FP) or intersection: 2_160721_340000000.png 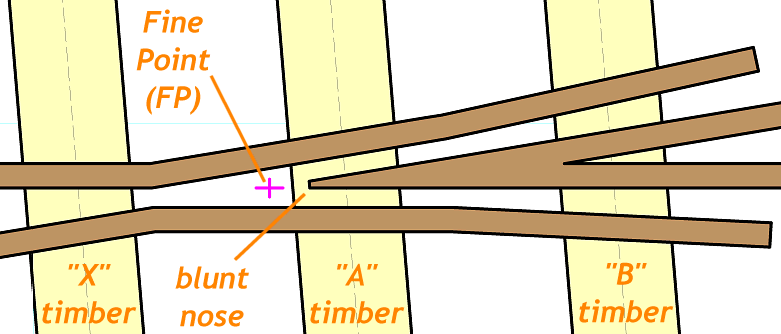 The "point of switch" is called the toe. The lead lengths from the toe are shown in the information panel: 2_071311_170000000.png 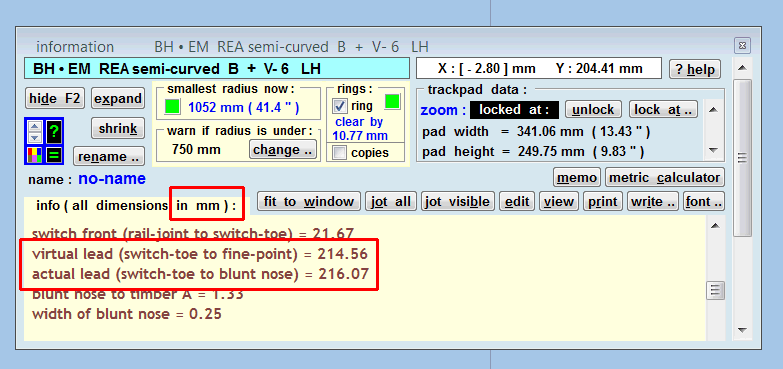 You need to scroll the information panel to see these. The dimensions are in model mm and will change as you adjust the turnout. You can't set them directly. • Clearly the difference between these two leads, the distance from FP to blunt nose, called "One Half of Frog Number in Inches" on your drawing becomes "Three Quarters of Frog Number in Inches" when the blunt nose is 3/4" wide. More next time. regards, Martin. |
||
|
posted: 7 Oct 2012 20:27 from: bambuko
click the date to link to this post click member name to view archived images |
Martin, Thanks a lot - this is perfect! Rather than interrupt your flow with additional questions I will wait until you complete all the points (pun not intended In the meantime I will continue to explore Templot and study your videos and tutorials BTW (for your amusement) - this is what happens when one tries to use 180Mb bitmap as a shape in Templot, while watching your video at the same time IMG_6255.jpg  All sorted out now (including updated driver for video card) and hopefully slightly smaller file will not cause any more problems... It's a first time I've had blue screen on this PC Chris |
||
|
posted: 7 Oct 2012 20:44 from: Martin Wynne
click the date to link to this post click member name to view archived images |
bambuko wrote:BTW (for your amusement) - this is what happens when one tries to use 180Mb bitmap as a shape in Templot, while watching your video at the same timeHi Chris, The problem is that Templot needs to zoom in over bitmaps much further than almost any other software, especially when printing. On some systems, if you zoom in so far that a single pixel fills the screen, you don't even get a blue screen -- just an instant hardware restart! Which is a bit alarming. I've tried to put in some limits, but it's difficult without restricting desired functionality. Note that the video says you must use BMP files for picture shapes. This is no longer the case in Templot2 -- PNG or JPG files are now supported, and they don't need to be in the SHAPE-FILES folder. This doesn't change the amount of program memory needed, but makes the files a bit more manageable. The video is on the list for a revision. regards, Martin. |
||
|
posted: 7 Oct 2012 21:07 from: bambuko
click the date to link to this post click member name to view archived images |
Thanks! That's very good news. I will change to .png straight away and perhaps start with something simpler just for practice. Chris |
||
|
posted: 7 Oct 2012 21:23 from: Martin Wynne
click the date to link to this post click member name to view archived images |
Hi Chris, If you are playing with picture shapes, you should know that there are some changes coming in the next update. I have added an improved straightening function, and some additional functions for moving and scaling picture shapes so that they can be locked to the notch or to the spacing-ring tool. See: topic 2057 - message 13697 This is a constant problem in getting an updated set of docs done -- things don't stay the same long enough. regards, Martin. |
||
|
posted: 7 Oct 2012 21:53 from: bambuko
click the date to link to this post click member name to view archived images |
Don't want to stray too much OT ... but yes This BTW is what I am playing with: brady%2520lake%2520module.jpg  This is in CAD before I'd given up and found Templot. CAD is easy if things are straight, but gets complicated if you want things to curve smoothly Chris ps You are not unique in finding it difficult to keep changes documented and updated. It seems to be normal state of affairs with any software |
||
|
posted: 8 Oct 2012 00:12 from: Martin Wynne
click the date to link to this post click member name to view archived images |
Hi Chris, 3. The American "Degree of Curve" notation isn't used in the UK or in Templot. Radii are always specified directly, and often measured in chains -- a UK chain is 66ft. (Also the length of a cricket pitch between the wickets. 2_070542_140000000.png  Q2. This radius is called the turnout radius. It can apply to the gauge-face of the outer rail, or to the track centre-line. This can sometimes lead to confusion. Templot specifies which is meant in the information panel: 2_071818_210000001.png 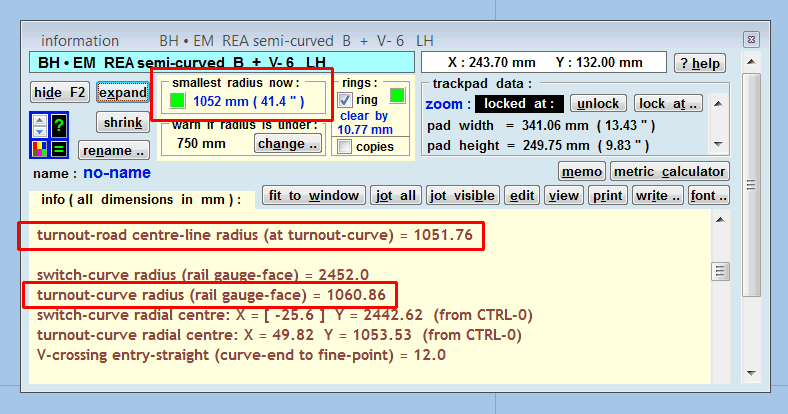 Again, you can't enter this directly. The dimension shown is calculated from the other dimension settings. The track gauge in this example is 18.2mm (EM gauge), so the difference is 9.1mm. Q3. This is called the V-crossing entry-straight. It is available only on regular type V-crossings. It can be adjusted by mouse action, or in this case it can be entered directly. However, note carefully how it is dimensioned. In Templot it is measured to the FP, not the blunt nose, and measured square along the main rail, i.e. it is a component of the lead length. If you want a known dimension along the turnout rail to the blunt nose as in your PRR drawing, you must do some calculations* at the known crossing angle (frog number) to arrive at the required dimension to enter. Templot draws a marker line across between the rails at the end of the turnout curve. The red object here is the ruler tool: 2_071818_210000000.png 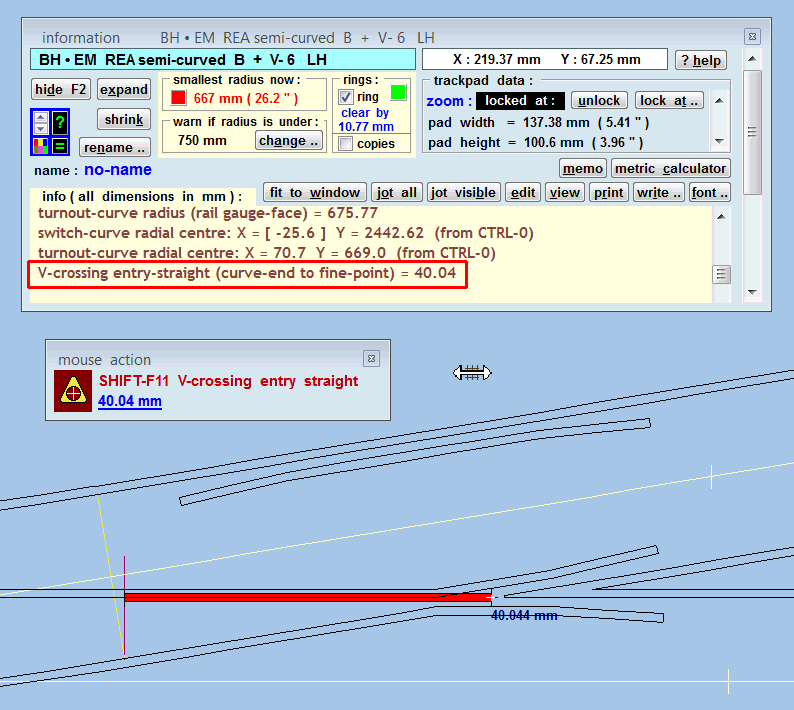 To enter this dimension directly you can click the dimension showing in blue above on the mouse action panel, or real > V-crossing options > V-crossing settings... menu item: 2_071828_550000000.png 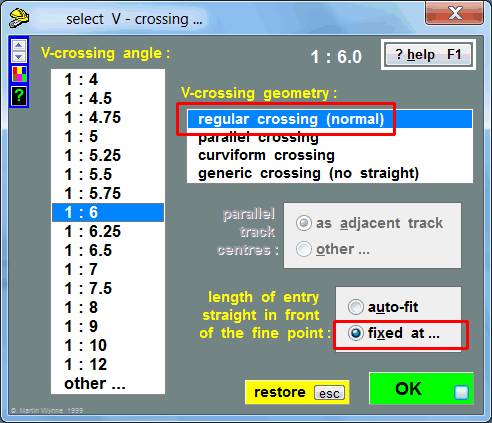 Click the fixed at... option and then OK, after which the data-entry window appears on which to enter this dimension. (This dialog is unchanged for many years, notice the 1999 copyright in the bottom corner. *If trig calculations are not your strong point, just ask on here and I will do it for you. Or someone else will. • An alternative method would be to lay a dummy plain track background template of the required tangent length in place below this V-crossing and adjust the entry straight until you get the required alignment. Put the fixing peg on the FP (CTRL-4) while doing this. Use tools > make branch track to create the dummy template, set the length (geometry > template lengths (mm)...) and snake (CTRL-F6) it back to align with the blunt nose. Turn off the track centre-lines on the control template so that you can see what you are doing more easily. Delete the dummy template afterwards. That sounds a lot, but once you are familiar with Templot it's quicker than dabbing the calculator and entering dimensions, and you can see directly that it is correct. More next time. regards, Martin. |
||
|
posted: 8 Oct 2012 11:25 from: Martin Wynne
click the date to link to this post click member name to view archived images |
Hi Chris, 4. Your drawing seems to show curved switches with a 7" heel offset. This is a bit surprising, because almost all US switch drawings I have seen show straight switches with a standard 6.1/4" heel offset. 2_070534_550000000.png  You need a switch drawing to see the full details. Most US switches have a point thickness of 1/8" and the switch drawing therefore shows a "vertex length" in front of the points in which the switch deflection angle runs out to zero. To accommodate the 1/8" points the track gauge is increased by that amount through the switch, running out to standard gauge beyond the switch. Templot doesn't support these features directly (they have been on my to-do list for years What this means is that a full representation of US switches in current versions of Templot needs to be built up from multiple partial templates and is not for the faint-hearted. However, by treating the vertex point as the switch toe, you can replicate the US geometry closely. This means adding the vertex length to the switch length, and subtracting it from the displayed lead lengths. On the printed construction template the points will be shown extending to the vertex point, and you must remember to shorten them back to the real toe position when building the switch. Your drawing doesn't show any details for a vertex point, so it's not possible to completely answer your questions. I do have a lot of PRR drawings on file, but not enough US prototype knowledge to know if they are applicable to your prototype and time period. So I can only answer assuming the point thickness and vertex length are zero in the UK pattern. 2_070542_140000000.png  Q4. The switch length is called "lead length to heel" in Templot. The heel position is not necessarily at the physical end of the switch rail (point rail) and can be a nominal position some way short, usually coincident with a rail fixing (chair, baseplate, tieplate). Q5. The radius of the outer rail is called the "switch radius" in Templot. This is applicable only to curved and semi-curved switches. (For straight switches Templot displays a derived "switch radius" as a guide for rolling-stock design, but it is not measurable anywhere on the physical switch.) To create your custom curved switch start from real > switch settings... menu item. Select a custom slot in the list to contain it, and then click the set custom switch... button: 2_080445_230000000.png 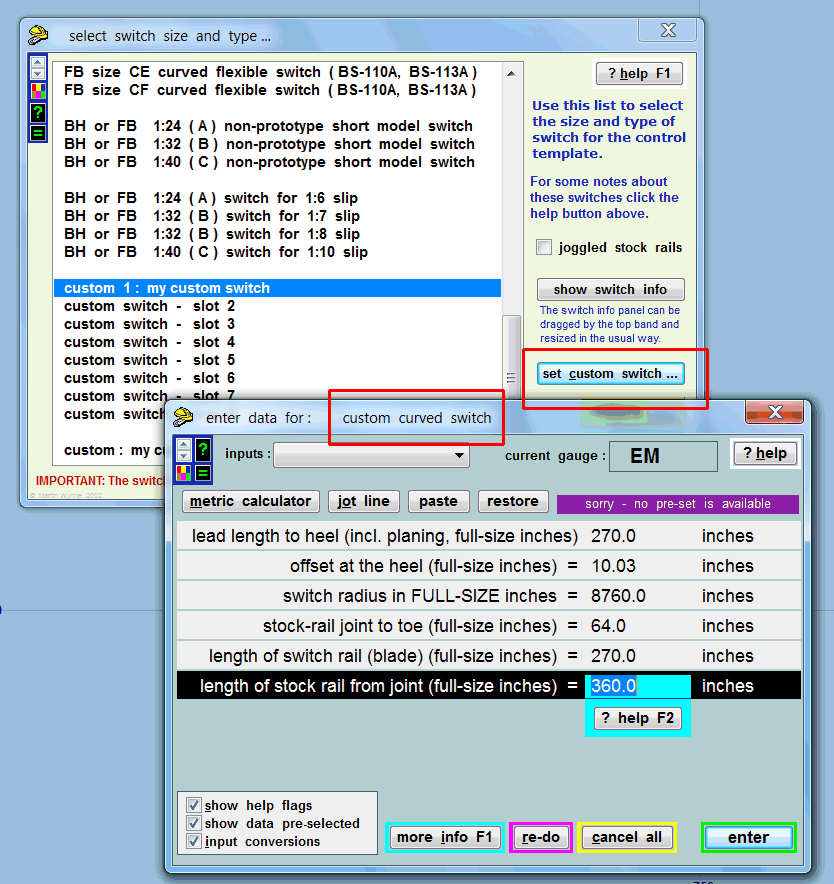 (The dimensions showing are for a UK curved switch of the GWR.) Enter your known dimensions. The "offset at heel" is called "Heel Gage" on your drawing (7"). The bottom 3 dimensions relate to the physical lengths of the rails, and hence the positions marked as rail joints and the adjacent timber spacings. They don't affect the rail geometry. The "tangent length" between a crossover shown on your drawing depends on the track spacing (tools > adjacent track centres...) and is created automatically when you do tools > make simple crossover. You don't normally need to consider it. For accurate prototypical results you need to change to CLM unit angles after each change to the V-crossing angle (do > convert RAM to CLM). More information about that: message 2081 Also of course, your track gauge needs to be an exact scale setting. At 1:220 scale that means 6.52mm for standard-gauge track (P-220 in Templot). I hope this has answered your questions, but I expect you will have a few more. regards, Martin. |
||
|
posted: 8 Oct 2012 12:09 from: bambuko
click the date to link to this post click member name to view archived images |
Thank you very much Martin, That's plenty enough to be getting on with. It is now my turn I'll be back (with questions no doubt Chris and... continuing a day later: I have spent today going over your points Martin and I am very happy chappy Not only did you answer all my questions about Templot, but also helped me to solve some of the problems I had with understanding of the data from PRR. Originally some of the dimensions didn't quite add together when drawn in CAD and I have blamed "...prototype drawings created before the digital age to contain errors..." Well, as it turns out, there was nothing wrong with old drawings, it was just me being slow I have now updated data table in my first message and re-drawn #10 turnout/crossing in CAD to test that it all adds up OK: 2547_091827_360000000.png  In red are UK equivalent terms for cross-reference. In red are UK equivalent terms for cross-reference. I am now ready to put it all in practice in Templot Chris |
||
| Last edited on 9 Oct 2012 23:33 by bambuko |
|||
|
posted: 11 Oct 2012 22:37 from: bambuko
click the date to link to this post click member name to view archived images |
Martin Wynne wrote: ...For accurate prototypical results you need to change to CLM unit angles after each change to the V-crossing angle (do > convert RAM to CLM)...Martin, I have no problem with RAM ve CLM. As far as I understand it in order to get my turnout #10 (which is 1:10 CLM) in Templot I need to enter 9.97502 as turnout angle: 2547_111728_500000000.png 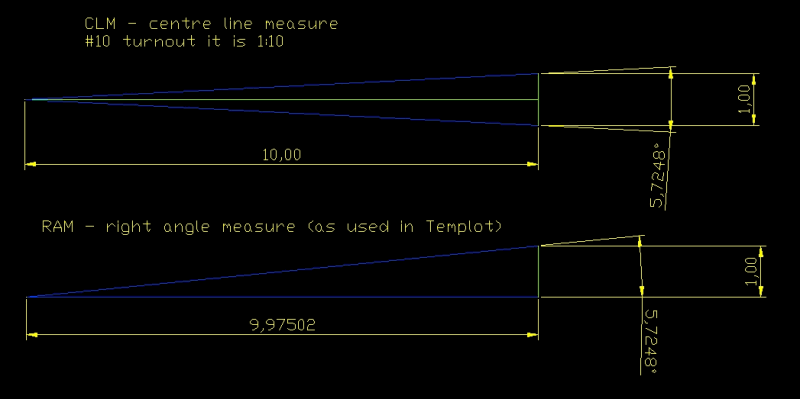 The bit that baffles me is ...you need to change to CLM unit angles after each change to the V-crossing angle... I am not sure I follow you I thought I specify this angle once, save this template as #10 and use it forever after like this? thanks Chris |
||
|
posted: 11 Oct 2012 23:17 from: Martin Wynne
click the date to link to this post click member name to view archived images |
bambuko wrote:The bit that baffles me isHi Chris, What I meant is that Templot works in RAM units, there isn't a switch to change to working in CLM units. That's been on the to-do list for a long time, but there are difficulties. So what you do if you want a 1:10 CLM template is to enter the angle as 1:10, and then click the do > convert RAM to CLM menu item. Templot then changes the angle to 1:9.98* RAM (which is 1:10 CLM). And yes, if you don't change it the template will remain at that angle when stored and saved. But clicking that menu item doesn't convert Templot to working in CLM. So the next time you enter an angle of say 1:8, it will be RAM, and if you wanted that to be CLM, you have to click the menu item again. The V-crossing angle is displayed in both RAM and CLM in the info. *displayed to two decimal places. The internal angle will be an exact conversion. • if you want to enter the angle in decimal degrees instead of unit angles, prefix it with a letter k. So entering k5.75 sets the angle to 5.75 degrees (5o45'). • if you want to enter the angle in % gradient instead of unit angles, prefix it with a letter g. So entering g25 sets the angle to 25% (1:4 RAM). There are several more of these input-conversion code letters. For example prefix letter i lets you enter inches when Templot is asking for mm. So i10 sets a dimension to 254mm (10"). Follow the help links on the data-entry dialog for more about input conversion factors. You can also define your own custom factors. p.s. I have today answered a question on RMweb about creating custom switches, including a link to a Templot video. You may find it relevant to what you are doing: http://www.rmweb.co.uk/community/index.php?/topic/62733-diagram-of-dimensions-for-templot-custom-switch/#entry809727 topic 376 2_231113_100000000.png 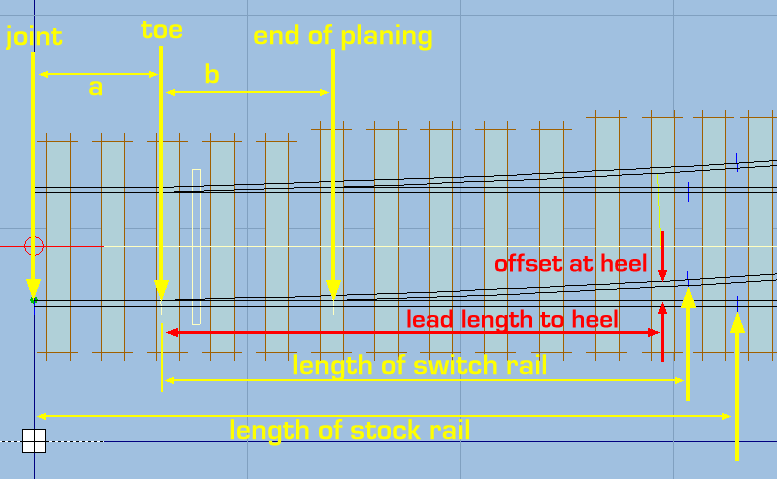 regards, Martin. |
||
|
posted: 11 Oct 2012 23:50 from: bambuko
click the date to link to this post click member name to view archived images |
Martin, thanks for detailed explanation - understand it now. For me it's easier to calculate whatever Templot wants i.e. RAM (using CAD, spreadsheet, or calculator,etc, etc) and enter it directly, instead of using Templot to "...convert RAM to CLM..." 2547_111858_470000000.png 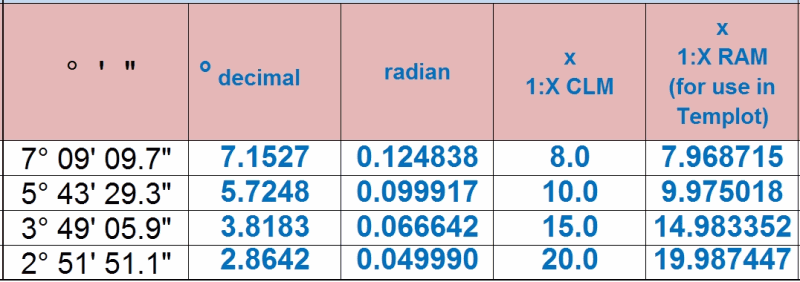 I am only likely to need four different angles? Custom switch video sounds like great idea I got stuck with my turnout trying to specify custom timber distances I will get there eventually Chris |
||
| Last edited on 11 Oct 2012 23:59 by bambuko |
|||
|
posted: 12 Oct 2012 00:13 from: Martin Wynne
click the date to link to this post click member name to view archived images |
bambuko wrote:Custom switch video sounds like great ideaHi Chris, Bear in mind that the video shows a narrow-gauge turnout and uses generic switch timbering for convenience, instead of entering the individual custom timber spacings. Can you expand on "filing concepts"? Do you mean computer files, or physically filing metal from your switch points? regards, Martin. |
||
|
posted: 12 Oct 2012 01:40 from: bambuko
click the date to link to this post click member name to view archived images |
I meant computer files and the way it works in Templot. Probably the best I found till now is this: http://www.templot.com/martweb/gs_box_notes.htm Chris |
||
|
posted: 12 Oct 2012 02:19 from: Martin Wynne
click the date to link to this post click member name to view archived images |
Hi Chris, This might help: http://templot.com/companion/index.html?gs_baffled.htm regards, Martin. |
||
| Please read this important note about copyright: Unless stated otherwise, all the files submitted to this web site are copyright and the property of the respective contributor. You are welcome to use them for your own personal non-commercial purposes, and in your messages on this web site. If you want to publish any of this material elsewhere or use it commercially, you must first obtain the owner's permission to do so. |