Templot Club Archive 2007-2020
|
|||
| author | remove search highlighting | ||
|---|---|---|---|
|
posted: 20 Jan 2013 17:40 from: CoBo
click the date to link to this post click member name to view archived images |
Hello, I'm Mike from Nottingham, been modelling since forever but only now taking my very first tentative steps into the world of Templot and building my own track. I've learned more about points and crossings in the last two days than the rest of my life. I've a 12'6" x 10'6" loft layout which was going reasonably okay until I had a bout of depression about my efforts when for some reason I compared them to others. This resulted in me taking up all scenic trackwork but not the off-scene bits which are mainly Tillig and Peco code 83 - I'm now ready to have a go relaying the scenic section and want to have a look at the Clungunford track diagram in more detail as it's very similar to what I want to do, but I can't find it in Templot. 1) Where is it and how do I open it up? 2) Having done that, is it possible to flip the whole diagram over to have the lead in at the opposite side? Thanks for any help Mike |
||
|
posted: 20 Jan 2013 18:03 from: Rob Manchester
click the date to link to this post click member name to view archived images |
Hello Mike, I think Clungunford was only included with the older versions of Templot as the new install I have on this machine doesn't have it. I think I have it on my other machine if nobody else lets you have it before I get there. I seem to remember it was EM gauge. And yes it can be flipped over if you wish. Rob |
||
|
posted: 20 Jan 2013 20:33 from: Martin Wynne
click the date to link to this post click member name to view archived images |
Hi Mike, Welcome to Templot Club. Here's Clungunford attached below. I have reversed it for you. Bear in mind that this is an old design, going back to the first version of Templot in 1999. It's in EM gauge, with GWR-pattern switches. Save it in your C:\TEMPLOT_DEV\BOX-FILES\ folder. Then click the reload button on the Templot2 startup dialog, or the main > reload / add from file... menu item on the trackpad, and select the clungunford_reversed.box file. regards, Martin. |
||
| Attachment: attach_1559_2144_clungunford_reversed.box 367 | |||
|
posted: 21 Jan 2013 07:47 from: CoBo
click the date to link to this post click member name to view archived images |
Thanks for your quick response fellas, I'll have a peek... Mike |
||
|
posted: 21 Jan 2013 12:41 from: CoBo
click the date to link to this post click member name to view archived images |
Thanks for info re Clungunford... however, probably as expected, I now have another problem. I've read on another thread about loading baseboard shapes into Templot - and I think I've managed to do this - well it's in my 'shape-files' file. However, when I try to do anything with it all I get is the screen shown below or the normal trackpad screen. 2626_210727_200000000.png 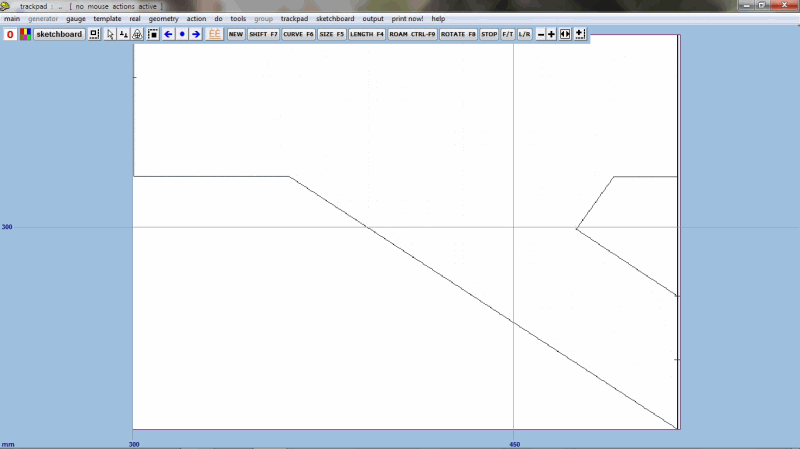 My scenic baseboard is as shown and is 297cm x 216cm down the right edge. The odd shape at the right edge is a lift out section. I can get the normal trackpad screen or this one but cannot a) get my grid to show and b) get the trackpad to display the baseboard as a background so I can start to design my trackwork. I've managed to find the 'transparent' tick box - which has turned everything blue, and I think I entered the board dimensions in mm not cm (can I alter this?). A pointer(s) would be much appreciated as I just seem to be cocking things up at present..... |
||
|
posted: 21 Jan 2013 12:59 from: Martin Wynne
click the date to link to this post click member name to view archived images |
Hi Mike, Templot works in mm for model dimensions and inches for prototype dimensions (engineers don't use cm You can show the grid in cm, but working in cm is not easy. I suggest you change the dimensions of your picture shape. On the modify shape tab click the change... button and re-enter the dimensions in mm. regards, Martin. |
||
|
posted: 22 Jan 2013 19:20 from: CoBo
click the date to link to this post click member name to view archived images |
Slowly getting my head round things but.... If I draw a plan which has two pieces of plain track crossing over each other forming an 'x', can Templot automatically convert the crossing point into some form of diamond crossing or do I need to build the crossing? What is and how do I build a 'switched crossing' ? Thanks |
||
|
posted: 22 Jan 2013 19:40 from: Martin Wynne
click the date to link to this post click member name to view archived images |
CoBo wrote:If I draw a plan which has two pieces of plain track crossing over each other forming an 'x', can Templot automatically convert the crossing point into some form of diamond crossingHi Mike, Yes. Start with the two lengths of curved plain track crossing over each other, or one curved and one straight length. One should be a background template and the other should be the control template. Click on the background template. On its pop-up menu, click the peg/align tools > make diamond-crossing at intersection menu item. Follow the instructions and wait a moment while Templot does the calculations. You will then need to split the underlying original background template and shorten each half back accordingly. The method won't work for transition curves*, it is for straights and fixed-radius curves only. Also it is very easy when testing to have the tracks crossing at too short an angle. Templot can't produce crossings shorter than 1: 1.5 RAM ( i.e. not more than 33.7 degrees). This method also works for two straight tracks intersecting -- in that case the result is a regular diamond-crossing. _______ For all irregular diamonds you will probably want to do some timber shoving to tidy them up. The program needs some further work in this area. Note that the DP peg position (CTRL-3) for an irregular half-diamond is not coincident with central CTRL-0 position and serves little practical purpose. Or at least, I haven't found a use for it yet. *There is in fact a way of working with transition curves, but it requires several additional adjustments so not really for beginners. regards, Martin. |
||
|
posted: 22 Jan 2013 22:26 from: Rob Manchester
click the date to link to this post click member name to view archived images |
Mike, A switched crossing is usually called a single or double slip. Based on a diamond crossing but with the addition of pairs of switch rails to allow routing other than straight over the diamond. If both routes have the option of being switched it is a double slip, if only one of them then it is a single slip. There are tutorials on building them if you search this site. Have a strong coffee before your first go through........ Rob |
||
|
posted: 22 Jan 2013 23:13 from: Martin Wynne
click the date to link to this post click member name to view archived images |
CoBo wrote:What is and how do I build a 'switched crossing' ?Hi Mike, Did you mean a "switch-diamond"? Here are a couple of images to help explain.These are switch-diamond-crossings (i.e. they have movable K-crossings), but you can add slip roads to make them into slips, just as for fixed K-crossing diamonds. The two sets of moving switch blades at the centre always move together, in opposite directions: switch_diamond_10bh.jpg  switch_diamond.jpg  Notice that in a flat-bottom switch-diamond (lower photo) the switch tips (points) are carried on two separate timbers. In a bullhead switch-diamond (upper drawing) both switch tips share a common wider centre timber. Here is a switch-diamond in early FB track at Bilton Junction, clamped out of use. Photo thanks to Mick Nicholson: 2_221106_110000000.jpg 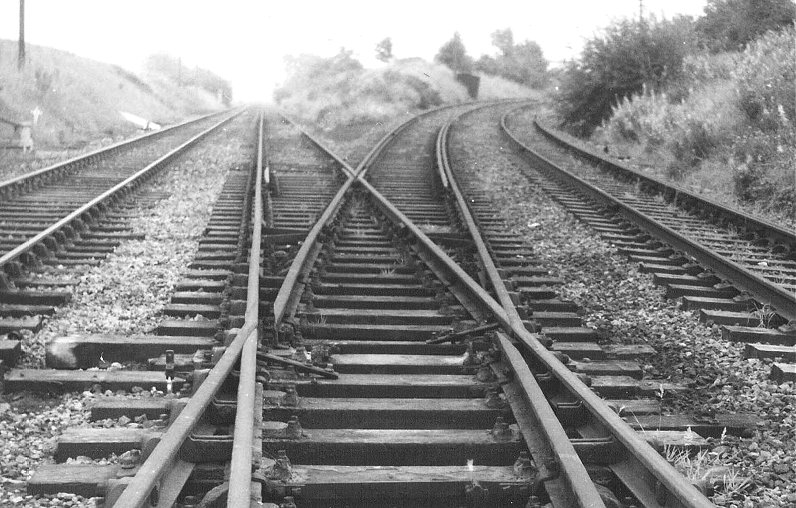 Here is an excellent picture from Mick Nicholson showing a flat-bottom double-slip with movable K-crossings. As one switch blade opens, the other closes. You can see that this doesn't affect the provision of the slip roads in the other rails: fb_movablek_dslip.jpg  © thanks to Mick Nicholson Using movable K-crossings will give you very much more reliable running at flat angles, and they are much easier to construct because you don't have to find room for the K-crossing check rails. The only downside is the need for two extra point motors (or only one if you make a suitable rocking crank device to drive both K-crossing switches from a single motor). Switch-diamonds are mandatory if the crossing angle is flatter than 1:8* and Templot automatically swaps to a switch-diamond at these angles, unless you change the settings. *or less in curved track. For some more information about all this, click: topic about switch-diamonds . Ask again if you need more. regards, Martin. |
||
|
posted: 23 Jan 2013 10:03 from: CoBo
click the date to link to this post click member name to view archived images |
Thank you both - that's a lot clearer now. As I'm hoping to use bullhead rail it was the first of Martin's diagrams that grabbed my attention and, whilst I understand the need for two motors working together but in opposite directions, I fail to see how this can work if both sets of point blades are fixed to a common shared central timber as shown on the diagram - the FB picture is understandable in this respect, ie two timbers, two motors. There's obviously a simple explanation somewhere but I can't see it. Help again please... EDIT: I've managed to make a regular diamond using the 'peg/align' tool (quite simple when you know how) but I fancy a switch diamond - can I alter the regular for the switched variety? |
||
| Last edited on 23 Jan 2013 10:22 by CoBo |
|||
|
posted: 23 Jan 2013 10:20 from: Martin Wynne
click the date to link to this post click member name to view archived images |
CoBo wrote:I fail to see how this can work if both sets of point blades are fixed to a common shared central timber as shown on the diagramHi Mike, Prototype point blades are not fixed to timbers. That happens only in some types of model track -- using a sliding timber as a simple means of moving the points instead of one or more separate stretcher bars. There is a good diagram of prototype arrangements and stretcher bars in the Grayrigg accident report (on pages 10 and 11): download: http://www.raib.gov.uk/cms_resources/081023_R202008_Grayrigg_v5.pdf from: http://www.raib.gov.uk/publications/investigation_reports/reports_2008/report202008.cfm regards, Martin. |
||
|
posted: 23 Jan 2013 10:28 from: Martin Wynne
click the date to link to this post click member name to view archived images |
CoBo wrote:EDIT: I've managed to make a regular diamond using the 'peg/align' tool (quite simple when you know how) but I fancy a switch diamond - can I alter the regular for the switched variety?p.s. to your edit. Yes -- real > K-crossing options > movable K-crossings (switch-diamond) menu option. Martin. |
||
|
posted: 23 Jan 2013 13:28 from: CoBo
click the date to link to this post click member name to view archived images |
Martin Wynne wrote: Prototype point blades are not fixed to timbers. That happens only in some types of model track -- using a sliding timber as a simple means of moving the points instead of one or more separate stretcher bars. Ok thanks Martin. In my mind I'd taken it as read that all our model trackwork would incorporate a 'tie bar' although in all honesty I hadn't looked at the Templot templates to see if they were there. I think I'm suffering from reading overload and self inflicted confusion as I distinctly recall reading that 'x' had to be fixed to a timber and not left hanging in the air, which I now realise relates to the frog (or 'V' crossing) and not the switch diamond or point blades. Re-reading some of Gordons thread on ET, I see he has replaced the first sleeper each side of the centre shared one to use as improvised stretcher bars, so I think I'll adopt the same principal. Thanks again Mike |
||
|
posted: 23 Jan 2013 14:23 from: Martin Wynne
click the date to link to this post click member name to view archived images |
CoBo wrote:I distinctly recall reading that 'x' had to be fixed to a timber and not left hanging in the air, which I now realise relates to the frog (or 'V' crossing) and not the switch diamond or point blades.Hi Mike, For standard-gauge track the blade tips should also be supported on a slide chair, not overhanging between the timbers. But such things are sometimes seen on light flat-bottom track for narrow-gauge and industrial lines. Templot draws a baseboard drive slot between the first two switch timbers for whatever means of driving the blades you intend to use, simply as a position marker. It's not intended to represent anything prototypical. You can turn it off by unticking the do > switch drive mark menu item. regards, Martin. |
||
|
posted: 23 Jan 2013 16:35 from: CoBo
click the date to link to this post click member name to view archived images |
Thank you again Martin Talking of turning things off, how do you turn off template names? I've started my plan and it's full of '30-no name' etc which is quite distracting especially when the screen is zoomed out. Mike |
||
|
posted: 23 Jan 2013 16:39 from: Raymond
click the date to link to this post click member name to view archived images |
Just press the 'End' key, it toggles them on and off. Regards Raymond CoBo wrote: Thank you again Martin |
||
|
posted: 23 Jan 2013 16:44 from: CoBo
click the date to link to this post click member name to view archived images |
Thanks Ray - I think I've been through all of the drop downs and their sub menus but couldn't find it.... | ||
|
posted: 23 Jan 2013 18:27 from: Martin Wynne
click the date to link to this post click member name to view archived images |
CoBo wrote: I've been through all of the drop downs and their sub menus but couldn't find it....Hi Mike, It's on the trackpad menu, here: 2_231324_400000000.png 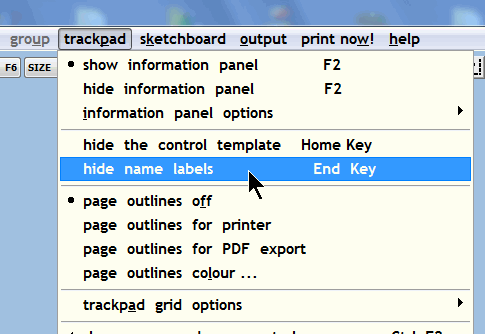 regards, Martin. |
||
|
posted: 23 Jan 2013 20:19 from: Martin Wynne
click the date to link to this post click member name to view archived images |
Hi Mike, As we are talking basics, I thought I would post this diagram again: 2_010658_360000000.gif 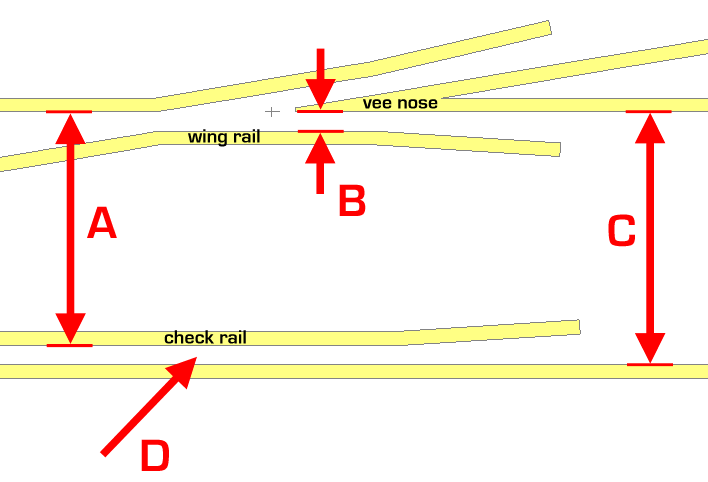 A is the check gauge. It is the most critical dimension in pointwork. If this dimension is too small, wheels running from left to right can hit the nose of the vee and very likely derail, or at least bump. If this dimension is too large, the wheel backs will bind or jam on the check rail. To make sure it's correct, the check rail is set using check gauge tools. For 00-SF and 00-BF this dimension should be 15.2mm, so you can use the same check gauge tools for both standards. B is the crossing flangeway gap. It's also important. If this dimension is too small, the wheel backs will bind or jam on the wing rail. If this dimension is too large, the gap in front of the nose of the vee will be too wide, and the wheels may drop into it with a bump. This gap is set using a small piece of metal shim called a crossing flangeway gauge shim. For 00-SF it should be 1.0mm thick. For 00-BF it should be 1.3mm thick. C is the track gauge. It shouldn't be less than the specified dimension, but can be wider. It is often widened on sharply curved track to ease the running of long-wheelbase vehicles. The track gauge is normally set using roller gauge tools, or alternatively using a 3-point gauge tool, which automatically widens the track gauge on curves. For 00-SF this dimension shouldn't be less than 16.2mm. For 00-BF it is normally 16.5mm. D is the check rail gap. The width of this gap doesn't matter a damn, providing it is wider than the wheel flanges. It's whatever you end up with after setting A and C correctly. But where the check rail is combined with a wing rail in complex formations (i.e. in parallel-wing V-crossings) it must be the same as B. regards, Martin. |
||
|
posted: 24 Jan 2013 08:34 from: CoBo
click the date to link to this post click member name to view archived images |
Thank you Martin. | ||
|
posted: 24 Jan 2013 10:20 from: CoBo
click the date to link to this post click member name to view archived images |
Oh no... this is frustrating me somewhat ! When I open up Templot I get to the Program menu and click 're-load' which has bought back my previous work sheet. I have a background onto which over a few days I managed to enter some basic track work, and yesterday spent about 4 hours sorting a switch diamond and other track work and got to the stage where (apart from tweaking timbers etc), I was happy with my overall layout plan. This morning however I opened up in the normal way and all yesterdays work had gone and I can't find it anywhere - only the background with my initial basic trackwork. Previously, as I added a new template I've clicked 'store and background' and then moved on to my next piece, which so far seems to have worked okay. Sorry to be a pain but can someone please explain how they close Templot down so that all of their work is still available on the next session. For instance, is it possible to create a data file to store so at least I have something to fall back on? Thanks yet again Mike |
||
| Last edited on 24 Jan 2013 10:22 by CoBo |
|||
|
posted: 24 Jan 2013 11:33 from: Martin Wynne
click the date to link to this post click member name to view archived images |
CoBo wrote:Sorry to be a pain but can someone please explain how they close Templot down so that all of their work is still available on the next session. For instance, is it possible to create a data file to store so at least I have something to fall back on?Hi Mike, Click this menu item: 2_240613_410000000.png 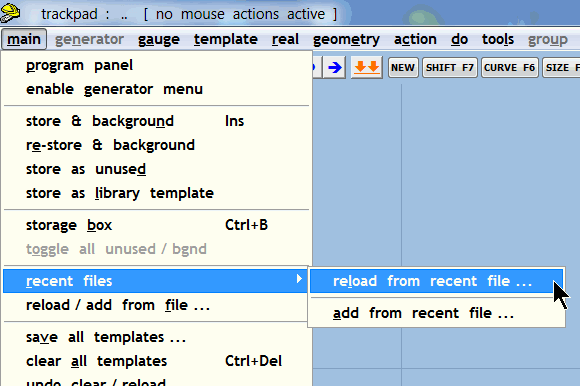 Which should show: 2_240613_410000001.png 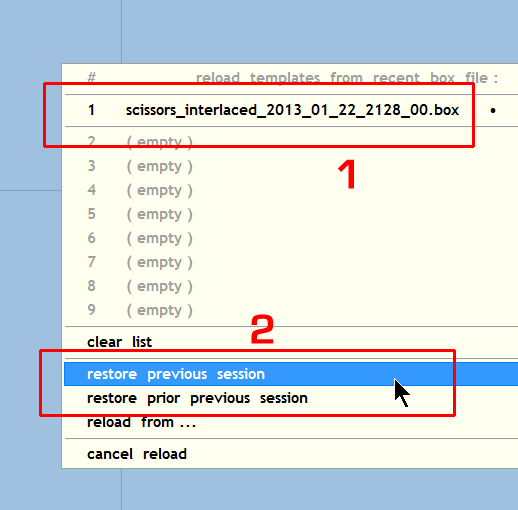 When you last quit Templot you saw a dialog asking if you wanted to save a template data file before doing so. 1. If you answered Yes (clicking the green bar or pressing the ENTER key), the file will be showing at the top of the above list. Click it to reload it. 2. If you clicked the blue bar to quit without saving, Templot kept a copy anyway. To get it back, click the restore previous menu item. Or the prior previous menu item to go back one more session. When you start Templot you are asked if you want to do this anyway -- by clicking the yes please green bar. Generally if you always click the green bar or press the ENTER key in the dialogs Templot will take the safe option and prevent anything being lost. You can read more about data files in Templot at: http://templot.com/companion/index.html?gs_baffled.htm#files I try very hard to make it as simple as possible for beginners, but I seem to be going wrong somewhere. regards, Martin. |
||
|
posted: 25 Jan 2013 09:14 from: CoBo
click the date to link to this post click member name to view archived images |
Martin Wynne wrote: I try very hard to make it as simple as possible for beginners, but I seem to be going wrong somewhere.Not at all Martin ! you're doing a magnificent job. A well known phrase containing the words 'new tricks' and 'old dogs' springs to mind so it is very much down to me/us, not you. It took me sometime to get into the regime of Open/Close/Save etc and your different approach takes someone of my age a while to adjust - you do encourage us to ask questions if we're not sure. Please bear with me, I'll get there eventually, but it may take just a little bit longer. Thanks for the very clear explanation and your patience. Mike |
||
|
posted: 25 Jan 2013 11:53 from: Martin Wynne
click the date to link to this post click member name to view archived images |
Hi Mike, Thanks for your kind words. Some of the confusion is caused by the similarity of the words "store" and "save". In an older version of Templot I used the word "keep" instead of "store" but I was persuaded to change it. I sometimes regret that, but it is too late to go back now. storing a template means that it is copied from the control template into your storage box as a permanent record of the state the control template was in at the time. Optionally, it is also displayed on the trackpad as a background template, usually as part of a track plan. The storage box is part of the running program and ceases to exist when you quit a Templot session. saving a Template data file means that all the stored templates in the storage box are saved to a file on your hard drive, in .box format. They are not lost while Templot is not running, and can be reloaded from the file into the storage box when you start a new Templot session. You can save all the stored templates to a file at any time by clicking the main > save all templates... menu item. If there have been any further changes to the contents of the storage box when you subsequently quit the Templot session, you will be asked if you want to save another file first. Usually you would want to do this. You can save a group of one or more templates to a file at any time by clicking the group > save group... menu item. In this way you can save a file containing a single template, or only the templates from a small area of your track plan such as a goods yard. You can load templates from a file at any time by clicking the main > reload / add from file... menu item. reload means that the new templates will replace those already in the storage box, if any. add means that the new templates will be added to the ones already there. If the storage box is not empty, you will see a confirmation dialog with these options after clicking the above menu item. regards, Martin. |
||
| Please read this important note about copyright: Unless stated otherwise, all the files submitted to this web site are copyright and the property of the respective contributor. You are welcome to use them for your own personal non-commercial purposes, and in your messages on this web site. If you want to publish any of this material elsewhere or use it commercially, you must first obtain the owner's permission to do so. |