Templot Club Archive 2007-2020
|
|||
| author | remove search highlighting | ||
|---|---|---|---|
|
posted: 5 Oct 2017 01:55 from: Richie Kynaston click the date to link to this post click member name to view archived images |
Hi All,Thanks to Martyn for adding me to the forum. I’m just getting back into model railways after a fair few years away, just involved with the big railway instead! I’m going to be modelling EM gauge with hand-built track and turnouts using EMGS Code 83 flat-bottomed rail. My plan is to use Colin Craig’s components (such as the Pan11 baseplate) on the scenic section to replicate a small part of the electrified WCML in the 1990s. While emailing Colin he mentioned that a things such as interlaced sleepers are a big no-no for concrete sleeped track, which brings me to my question. Hidden fiddle yard track will be copperclad so it doesn’t really matter what standard i use for that I guess! How can I get Templot to model the layout and produce the templates based around Code 83 flat bottomed rail on concrete sleepers? What do I need to changed, and indeed, is it actually possible? Are there any other differences to take into account that people can advise me about? Any help, pointers and general advice would be welcomed! I’ve used Templot and learnt how to do a couple of small layout designs but this one is more elaborate! Richie |
||
|
posted: 5 Oct 2017 07:53 from: Phil O
click the date to link to this post click member name to view archived images |
Hi Richie Welcome to Templot Club. Yes it's possible to do the things you require in Templot. When you open up Templot you will get a non standard gauge turnout to alter this to EM go to the GAUGE menu and select 18.2 EM, all your templates will now be in EM gauge. To alter the rail from Bullhead to Flat Bottom, go to the REAL, RAILS and select HEAD & FOOT and your templates will be in flat bottom. When I construct fiddle yard track I only put a sleeper in at about inch spacings and tend to miss every other one out on turnouts except under the nose where I build as per template. HTH Phil. |
||
| Last edited on 5 Oct 2017 07:54 by Phil O |
|||
|
posted: 5 Oct 2017 11:01 from: Tony W
click the date to link to this post click member name to view archived images |
Hi Richie. Further to Phil's reply, you may also need to go to REAL, RAILS, FLARED ENDS MACHINED if your turnout checks have tapered ends rather than being bent and then go TEMPLATE, SWITCH SETTINGS and choose an appropriate Flat Bottomed switch type. Regards Tony. |
||
|
posted: 5 Oct 2017 11:07 from: Martin Wynne
click the date to link to this post click member name to view archived images |
Hi Richie, Welcome to Templot Club. To set the sleeper size go to real > timbering > timbering data... menu item. Templot expects full-size prototype data in inches. If your prototype data is metric, you can enter it in mm by prefixing it with the letter m. For example, if the concrete sleepers are 250mm wide, you can enter that as m250. To set the sleeper spacing, go to real > plain track options > rail lengths and sleeper spacings menu item. If CWR (long-welded rail) is wanted click the custom settings... button to create a custom setting. Set a dummy "rail length" which is equal to the sleeper spacing, and have a single sleeper spaced at half that distance from the dummy "joint". Then click the real > plain track options > rail-joint marks > none menu option. regards, Martin. |
||
|
posted: 5 Oct 2017 12:16 from: RK
click the date to link to this post click member name to view archived images |
Phil O wrote: Hi RichiePhil,Many thanks that’s great. I thought it was going to be a difficult thing to do with loads of bits to change!! Cheers Richie |
||
|
posted: 5 Oct 2017 12:19 from: RK
click the date to link to this post click member name to view archived images |
Tony W wrote: Hi Richie.Tony,Thanks for that. I’m nowhere near knowledgable on these things - think more ill-informed idiot!! How/where would turnouts have tapered ends? Not something I’ve heard off before, so any direction/advice would be welcomed. Given in modelling the early 1990: WCML, can you suggest what the most appropriate setting would be? Richie |
||
|
posted: 5 Oct 2017 12:26 from: RK
click the date to link to this post click member name to view archived images |
Martin Wynne wrote: Hi Richie, Hi Martin, Wow! So many options in your software! Very impressed! I’m off to read Colin Craig’s articles on concrete sleepers trackwork, and to research Sleeper widths! Am I right in thinking that once the plan is complete and I’m doing the shoving bit, it works the same for Concrete sleepered track? I’m a bit of a way off that yet, but thought I’d ask while I remember! Also, could anyone confirm - I’ve seen Layouts of a four track main line, where each of the lines are laid parallel at equal spacing. Looking at the real thing and thinking about signals, bridges etc, that doesn’t seem right. Was there a standard spacing (appreciating that all locations can be as individual as the next) for double and quadruple track? I’m sure I’ve seen a diagram somewhere in the past that had all these things marked on together with cess details and that, but cannot find it now. I’ve been thinking about this layout for a while now and I’m of the opinion that we put so much time and effort into detailing locos and scenery, that I really should but the same effort into the trackwork! Hence all the questions. Thanks in advance for any help. Richie |
||
|
posted: 5 Oct 2017 12:41 from: Martin Wynne
click the date to link to this post click member name to view archived images |
RK wrote:Looking at the real thing and thinking about signals, bridges etc, that doesn’t seem right. Was there a standard spacing (appreciating that all locations can be as individual as the next) for double and quadruple track? I’m sure I’ve seen a diagram somewhere in the past that had all these things marked on together with cess details and that, but cannot find it now.Hi Richie, In UK practice you can't have multiple running lines at 6ft way. Sidings, loops and slow lines must be spaced at 10ft way (or 9ft way in special cases) from a pair of main lines which have 6ft way. This is for the safety of staff on the ground, and clearance for signal posts, etc. This rule produces the classic alternating wide and narrow spacings of track in pairs, as seen for example on the cover of David Smith's GWR track book: cvr_track_400px.jpg  In addition to that, track spacing has to be increased on sharp curves to allow running clearance for vehicle overhang. See the tools > dummy vehicle menu item for the tools in Templot to check and adjust clearances. regards, Martin. |
||
|
posted: 5 Oct 2017 12:53 from: Tony W
click the date to link to this post click member name to view archived images |
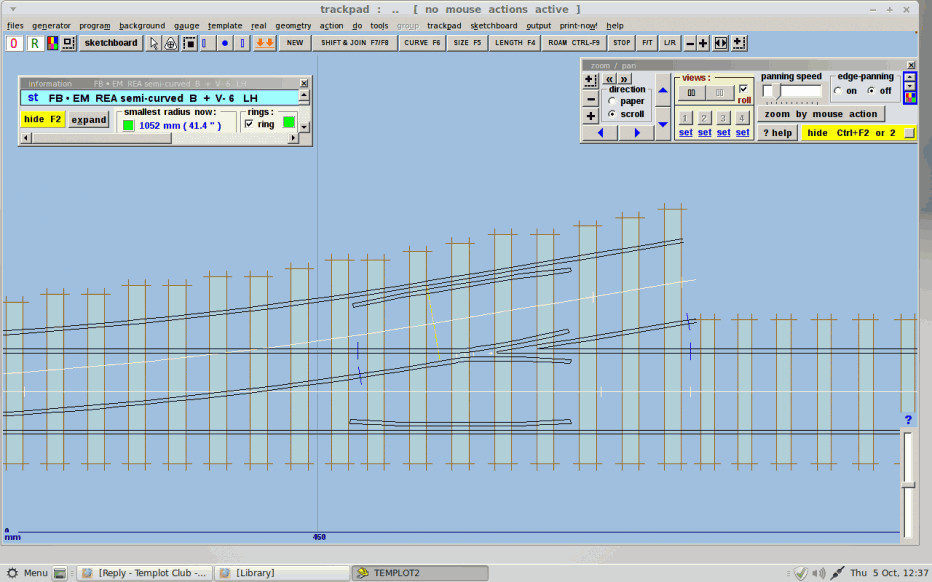
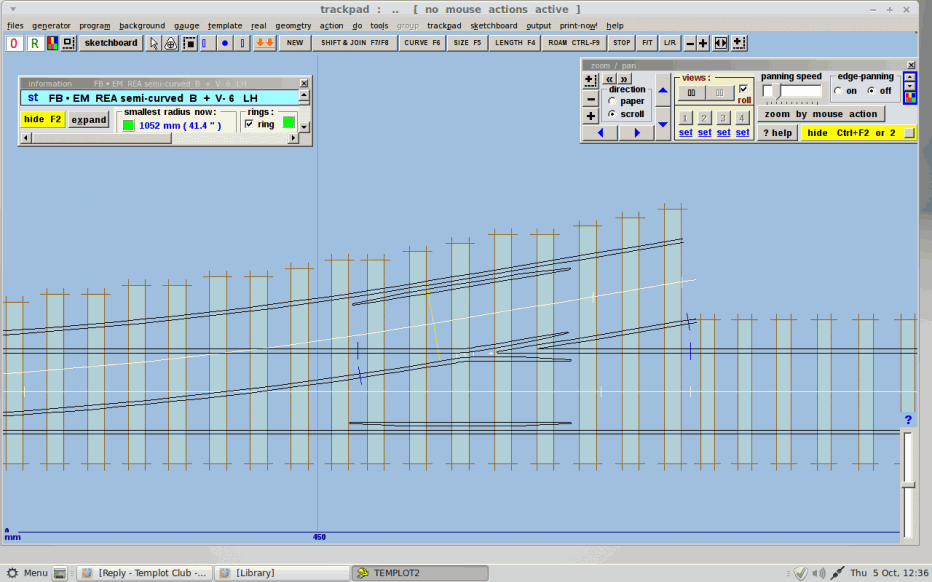
Hi Richie Screen shot with check rail ends bent. 2151_050739_350000000.png  Screen shot with check rail ends machined. 2151_050741_050000000.png  The later would be more appropriate to your era. Regarding the track spacings of quadruple tracks, there are two main ways of doing this. The WCML was generally arranged as Up Down fast, Up Down slow and would be spaced at 11'2" 15' 2" 11' 2" centres. The alternate way as exemplified by the ECML used Up slow Up fast Down fast Down slow spaced at 15'2" 11'2" 15'2" centres. These can be set under GEOMETRY, ADJACENT TRACK CENTRES. Regards Tony. |
||
|
posted: 5 Oct 2017 16:14 from: Richie Kynaston click the date to link to this post click member name to view archived images |
Martin Wynne wrote: RK wrote:Looking at the real thing and thinking about signals, bridges etc, that doesn’t seem right. Was there a standard spacing (appreciating that all locations can be as individual as the next) for double and quadruple track? I’m sure I’ve seen a diagram somewhere in the past that had all these things marked on together with cess details and that, but cannot find it now.Hi Richie, Martin, Many thanks - that makes a lot of sence i'll work on those principals. I'd found the 'dummy vehicle' instructions on the forum previously, so have made use of those. Are there any normal or standard figures i should be working to for curves - in terms of clearances? I seem to recall reading something previously about some form of approach to a curve as well, which i also need to go find and read up on. Thanks again for all your help Richie |
||
|
posted: 5 Oct 2017 16:19 from: Richie Kynaston click the date to link to this post click member name to view archived images |
Tony W wrote: Hi RichieHi Tony,You know the one thing that has amazed me with this hobby, since getting back into it on both rmWeb and this morning on here, is the kindness of others to help and willing share information. Really is great to see, so thank you. Also thanks for taking the time to do the two screen shots, I'd misunderstood you totally to start with, but seeing those and looking at the differences, the mist has cleared and I can totally see what you are talking about now! Thank, i'll work with the machined check rails as you suggest. Thanks for the spacing comment too. Just to make sure i've understood it right. The distance between the centers of the Down Slow, Up Slow would be 11' 2", then Up Slow to Down Fast spacing would be 15' 2", then Down Fast to Up Fast would be 11' 2"? I recall 'Up' being to London, so i think the WCML was Down/Up Slow, Down/Up Fast around the Stafford area, which is what I am modelling. Does the 11'2" measure apply through platforms as well? I appreciate adjacent roads will be further apart because of the platform width. Cheers Richie |
||
|
posted: 5 Oct 2017 17:01 from: Phil O
click the date to link to this post click member name to view archived images |
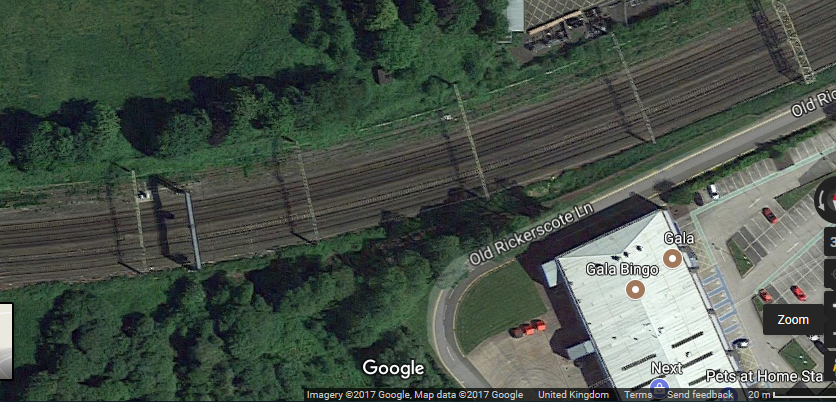
I have just had a look at Google Maps and got a satellite view screen shot of a section of WCML, just South of Stafford 38_051158_240000000.png  This shows 11' 2" 15'2" 11'2" centres, I'm not that aux faix with the WCML so I don't know what the pairings are. Phil |
||
| Last edited on 5 Oct 2017 17:03 by Phil O |
|||
|
posted: 5 Oct 2017 17:12 from: Richie Kynaston click the date to link to this post click member name to view archived images |
Phil O wrote: I have just had a look at Google Maps and got a satellite view screen shot of a section of WCML, just South of StaffordAh! Cheers Phil - now why didnt I engage brain and think of doing just that!!! .... or in the word of that illustrious leader of men - "ah! Wonder who'd be the first to think of that one Cheers Richie |
||
| Last edited on 5 Oct 2017 19:26 by Richie Kynaston |
|||
|
posted: 5 Oct 2017 17:49 from: Tony W
click the date to link to this post click member name to view archived images |
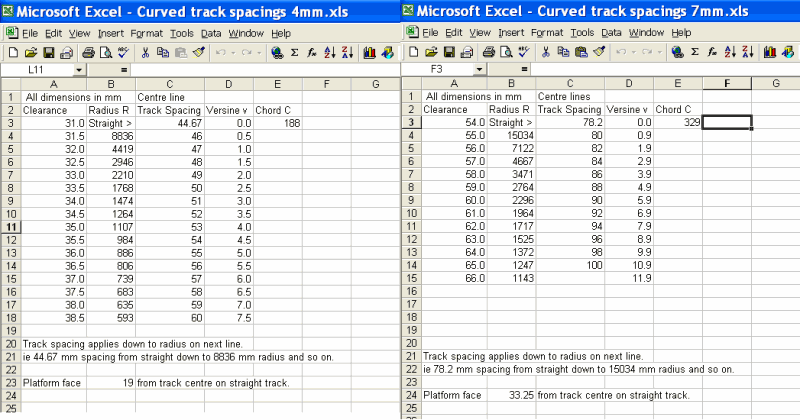
Hi Richie. You have understood the track spacings correctly. 11'2" centres gives the 6' way that Martin states and is the standard minimum, usually maintained between platform tracks although situations vary according to operational needs. Below is a table of model track centre spacings that I posted some years ago before Martin created the dummy vehicle facility. You may find it useful. 2151_201728_420000000.png  Regards Tony. |
||
|
posted: 5 Oct 2017 21:29 from: Richie Kynaston click the date to link to this post click member name to view archived images |
Thanks Tony. I take it from there that in EM, i'd use the 4mm table, take the larger of the two radii and use a centre line between them of x - for example where the larger of the two radii is 982, the centre line between the two tracks would be 54? Richie |
||
|
posted: 6 Oct 2017 11:56 from: Tony W
click the date to link to this post click member name to view archived images |
Richie Kynaston wrote: Thanks Tony. I take it from there that in EM, i'd use the 4mm table, take the larger of the two radii and use a centre line between them of x - for example where the larger of the two radii is 982, the centre line between the two tracks would be 54?Hi Richie. Not quite. The 4mm table obviously as the body width of the stock is the same regardless of the track gauge. The way the table works may not be completely obvious at first sight, however the straight track centre spacing can be applied down to a radius of 8836mm, 46mm centres down to 4419mm radius and so on. So the 54mm centres spacing would apply to radii down to 886mm. This is what the note at the bottom of the table tries to explain. I suppose technically the radius of a centre line between the two tracks should be used for the calculation. I generally tend to use the smaller radius of the two, but I don't think it would be that critical which track was used as the baseline. Remember to add 16mm (4ft) to the spacing figures to maintain the 15'2" centres. The spreadsheet that works these figures out was originally devised for my own use, but interest from other people persuaded me that it was worth making the results generally available. Regards Tony. |
||
|
posted: 6 Oct 2017 13:11 from: Martin Wynne
click the date to link to this post click member name to view archived images |
Hi Richie, Don't forget that you can use the dummy vehicle tools to set a clearance spacing on double track without even knowing the numbers. tools > dummy vehicle menu item. Here I have made you a bit of scruff video showing how to do that. The track is EM, inner radius is 900mm: http://flashbackconnect.com/Default.aspx?id=5TKjRjhcaeHNM176Xf2xUg2 I'm sorry it is scruffy and unedited. I'm currently working on the docs for these functions, but it is a full day's work to create a smooth-running video with interactive notes and a page in the Templot Companion. regards, Martin. |
||
|
posted: 6 Oct 2017 14:24 from: Richie Kynaston click the date to link to this post click member name to view archived images |
Tony/Martin, Both of you many thanks! Martin, don't worry about that, appreciate the rough video for help! Richie |
||
| Please read this important note about copyright: Unless stated otherwise, all the files submitted to this web site are copyright and the property of the respective contributor. You are welcome to use them for your own personal non-commercial purposes, and in your messages on this web site. If you want to publish any of this material elsewhere or use it commercially, you must first obtain the owner's permission to do so. |