Templot Club Archive 2007-2020
|
|||
| author | remove search highlighting | ||
|---|---|---|---|
|
posted: 29 Aug 2018 12:33 from: madscientist click the date to link to this post click member name to view archived images |
I had always assumed that double slips were controlled by two levers in the frame, and that when both levers were " normal " the slip acted like a conventional diamond , ( in both directions ) and then when each respective lever was pulled off , each " slip" was activated But PECO O gauge double slips are such that at no time can the slip operate as a simple diamond, because only one road is available on the diamond was this the case in the prototype ? Dave |
||
|
posted: 29 Aug 2018 13:27 from: Ian Allen
click the date to link to this post click member name to view archived images |
Dave, Double slips are indeed controlled by two levers, however, all the switch blades at one end are controlled together, and the same is true of the other end. Therefore, a double slip can never act as a diamond when the levers are normal in the frame, as one pair of blades at each end will always direct a train through one of the slips. .9k= Ian |
||
| Last edited on 29 Aug 2018 13:29 by Ian Allen |
|||
|
posted: 29 Aug 2018 13:56 from: Martin Wynne
click the date to link to this post click member name to view archived images |
madscientist wrote: was this the case in the prototype?Hi Dave, The usual arrangement with a double-slip when rodded to a signal box is that both sets of points at one end of the slip are linked together, and also linked to the turnout at the opposite end, so that all 3 sets of points work together on a single lever, like this: 2_290837_090000000.png  Pulling lever A reverses all 3 points marked A, setting the lower slip road for use. Pulling lever B reverses all 3 points marked B, setting the upper slip road for use. Pulling both levers A and B sets the diagonal road across the slip. With both levers normal, all the straight main roads are set. On a model, lever A can also be used to change the polarity of the V-crossing vA, and lever B can be used to change the polarity of the V-crossing vB. I don't know how the Peco double-slip is set up, but If I had one I would want to modify it to match the above. However you set things up, obviously only one road through a slip can be used at any given time, so I'm not too clear why you find that a problem? There is more detailed discussion of this subject in this topic: topic 1172 cheers, Martin. |
||
|
posted: 29 Aug 2018 15:04 from: madscientist click the date to link to this post click member name to view archived images |
However you set things up, obviously only one road through a slip can be used at any given time, so I'm not too clear why you find that a problem? cause I actually wanted to use it only as a single slip , but now Im going to replace the whole thing with a marcway single slip |
||
|
posted: 29 Aug 2018 15:14 from: Martin Wynne
click the date to link to this post click member name to view archived images |
madscientist wrote: Hi Dave,However you set things up, obviously only one road through a slip can be used at any given time, so I'm not too clear why you find that a problem?cause I actually wanted to use it only as a single slip , but now Im going to replace the whole thing with a marcway single slip A single-slip is exactly the same, only one road through it is capable of being used at any one time. I don't understand how a Marcway slip will be any different? cheers, Martin. |
||
|
posted: 29 Aug 2018 19:02 from: madscientist click the date to link to this post click member name to view archived images |
Martin Wynne wrote: madscientist wrote:I didn’t mean it would merely that I was replacing themHi Dave,However you set things up, obviously only one road through a slip can be used at any given time, so I'm not too clear why you find that a problem?cause I actually wanted to use it only as a single slip , but now Im going to replace the whole thing with a marcway single slip |
||
|
posted: 29 Aug 2018 19:15 from: madscientist click the date to link to this post click member name to view archived images |
Martin you might have a look at the two single slip arrangement here and suggest the lever frame sequence attachment.php?id=2726 Regards Dave |
||
| Attachment: attach_2726_3322_rmwebsignallingdiagram.pdf 622 | |||
| Last edited on 29 Aug 2018 19:18 by madscientist |
|||
|
posted: 29 Aug 2018 23:17 from: Martin Wynne
click the date to link to this post click member name to view archived images |
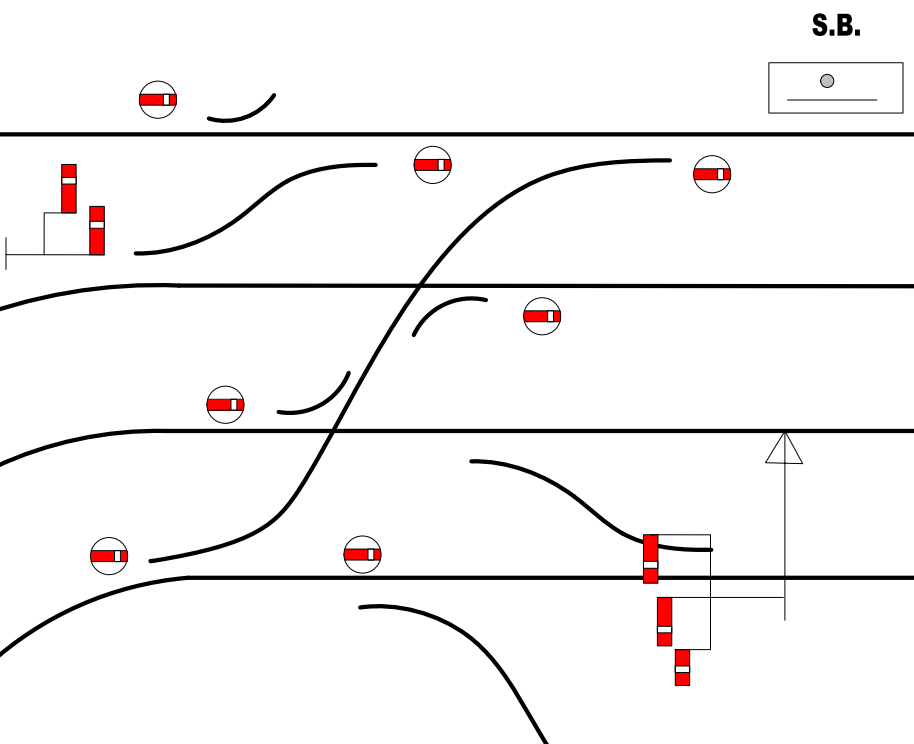
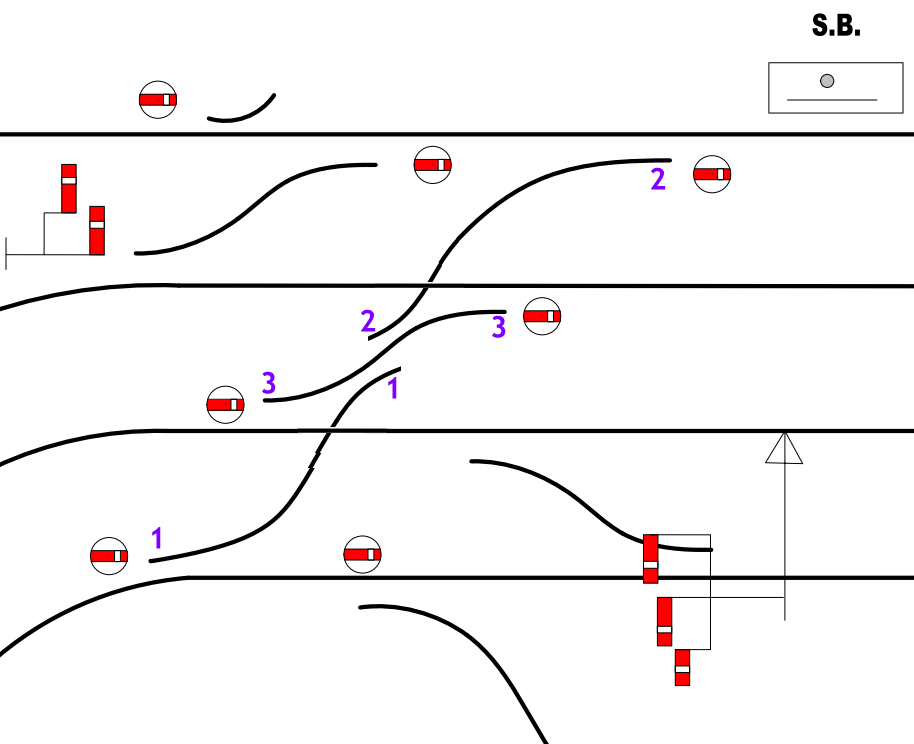
madscientist wrote: Martin you might have a look at the two single slip arrangement here and suggest the lever frame sequenceHi Dave, You have the diagram unusually arranged with the inner slip switches lying normal across the diamond: 2_291800_040000000.png  It is more usually arranged like this: 2_291801_020000000.png  Pulling lever 3 provides a crossover between the Up and Down Mains. Then also pulling lever 2 connects the Up Main to the Down Loop instead of the Down Main. Or also pulling lever 1 connects the Down Main to Up Loop instead of the Up Main. Pulling levers 1 and 2 instead of 3 provides a crossover between the two Loop lines. Here's a more conventional view: 2_300731_570000000.png  Slip switches 1 and 2 lie normal for the slip road, so that pulling only 3 provides a main line crossover. However, I see from your RMweb topic that you are modelling GWR practice, in which case things may be done differently. We need a reply from Howard (JFS) who is the signalling expert in these parts. It's important that the levers are arranged in the frame so that it is never necessary to pull a lever between two which are already pulled. cheers, Martin. |
||
|
posted: 30 Aug 2018 18:08 from: madscientist click the date to link to this post click member name to view archived images |
thanks | ||
|
posted: 14 Sep 2018 08:55 from: madscientist click the date to link to this post click member name to view archived images |
I managed to track down a numbered signal diagram of the station , badminton, that we based the current layout on , so I now have a lever numbering guide, I still have to work out the text for the leads as that wasn’t included What was interesting is the levers are grouped in the frame by road direction rather then physical location grouping ( which I thought was more common ) Interesting |
||
|
posted: 14 Sep 2018 10:07 from: Jim Guthrie
click the date to link to this post click member name to view archived images |
madscientist wrote: I remember a friend who worked for BR in Scotland telling me that levers were normally arranged so that the order of working a set of levers for a movement was in one direction. The direction of working levers could be from the end of the frame to the centre or the centre to the end. I believe different rail companies had their preferred way of doing things in laying out a frame. Jim. |
||
| Please read this important note about copyright: Unless stated otherwise, all the files submitted to this web site are copyright and the property of the respective contributor. You are welcome to use them for your own personal non-commercial purposes, and in your messages on this web site. If you want to publish any of this material elsewhere or use it commercially, you must first obtain the owner's permission to do so. |