Templot Club Archive 2007-2020
|
|||
| author | remove search highlighting | ||
|---|---|---|---|
|
posted: 27 Jul 2012 13:25 from: Alan McMillan
click the date to link to this post click member name to view archived images |
Hi all I've just created a new custom plain track setting for Swiss Federal Railways CWR and it's just dandy. However when I insert a turnout in the new plain track or use new template (quick set), it comes up with default (presumably GWR) sleeper spacings although the lengths appear to agree with the settings I've defined. Is there any way to get turnouts to take up the spacing settings I've defined by default rather that have me do an awful lot of timber shoving afterwards? Regards Alan |
||
| Last edited on 27 Jul 2012 13:25 by Alan McMillan |
|||
|
posted: 27 Jul 2012 13:55 from: Martin Wynne
click the date to link to this post click member name to view archived images |
Alan McMillan wrote:Is there any way to get turnouts to take up the spacing settings I've defined by default rather that have me do an awful lot of timber shoving afterwards?Hi Alan, Yes, use the modify on rebuild function. 1. Have the required settings in the control template. 2. Put the templates to be modified in a group. 3. On the storage box: options > modify on rebuild > timbering + lengths as the control template menu option. 4. group > rebuild group menu item. 5. make sure to turn this option off afterwards. When creating future templates, either insert turnouts in plain track, or real > plain-track options > rail lengths and sleeper spacings... , and select your custom setting. Either way, you shouldn't need to do any actual timber shoving just to use a custom plain-track setting in any template. regards, Martin. |
||
|
posted: 27 Jul 2012 15:22 from: Alan McMillan
click the date to link to this post click member name to view archived images |
Hi Martin, Thanks for the information. I may be missing something but when I went through your instructions, nothing seemingly happened at all. I created a new template and then inserted a turnout into it. I then used F3 and F4 to extend it and the plain track parts had the correct sleeper spacings but the turnout didn't. It also didn't remember to omit the rail joints which had to be removed by using the Rail Joint Marks menu item afterwards. I've attached the BOX file in case it helps. Regards Alan |
||
| Attachment: attach_1476_2034_gotthard_ramp_2012_07_27_1521_04.box 283 | |||
|
posted: 27 Jul 2012 15:25 from: Martin Wynne
click the date to link to this post click member name to view archived images |
Hi Alan, Can you clarify what you are trying to do? I thought you were asking about the plain track settings? regards, Martin. |
||
|
posted: 27 Jul 2012 15:33 from: Martin Wynne
click the date to link to this post click member name to view archived images |
p.s. Alan, I notice in your file that you have the rails set to FB, but the switch is an REA bullhead size. |
||
|
posted: 27 Jul 2012 16:10 from: Alan McMillan
click the date to link to this post click member name to view archived images |
Hi Martin I'm trying to make sure that my modified sleeper spacings are correct for all new templates I create in my new plan before I start it. I'm hoping to avoid having to go back and modify things later on as I'm a great one for forgetting details like that until I've done a ton of work. The REA turnout was used simply because I wanted to check that the modified spacings would appear and since it was the first one to come up I didn't bother to change it. In truth I hadn't remembered that I'd select FB rail earlier. It had slipped my mind because it doesn't show on the trackpad. The BOX file I sent is only a test on which I was trying things out. Alan |
||
| Last edited on 27 Jul 2012 16:10 by Alan McMillan |
|||
|
posted: 27 Jul 2012 17:56 from: Martin Wynne
click the date to link to this post click member name to view archived images |
Hi Alan, I'm sorry to be a bit dense, but I'm still not sure what you are asking. The basic way of custom working in Templot is: 1. create your customized control template with all the settings you need. 2. store it as library template to keep it safe for future use. 3. store it again and copy it to the background. 4. modify its size or position or extend and split off bits of it and insert turnouts in them, or whatever is needed to create the next one. 5. copy that to the background. and so on. If you already have some templates defining the required alignment, you use the align over background functions to put the control template on that alignment. You shouldn't need to enter the custom settings more than once if you work methodically. If you can describe exactly what you are trying to do, or what you are doing which isn't working, I can be more specific. regards, Martin. |
||
|
posted: 27 Jul 2012 18:06 from: Alan McMillan
click the date to link to this post click member name to view archived images |
Hi Martin I'm probably not being very clear. Sorry The problem I seem to have is that I have created a template with all the settings I need. The point is that when I copy it to the control, the timbers in any turnout I create using it don't have the modified sleeper spacings, they have what would have been there by default. If, however I extend this turnout in either direction by using F3 or F4 the modified spacings are evident, but I don't understand why. Alan |
||
|
posted: 27 Jul 2012 18:59 from: Phil O
click the date to link to this post click member name to view archived images |
Hi Alan Have you made a custom turnout with all the various changes needed IE. shoved the timbes etc to create the necessary spacings under the nose etc. F3/4 only deals with the plan track, once you have a custom turnout you the change it to plain track, before continuing. If all other trackwork is minted from this or a turnout inserted in the plain track all the information will produce the original turnout, you the use F5 to alter the crossing angle to suit. I have a custom GW turnout stored as a library file on my PC at home and when I start a new project I call that up and convert it to plain track and away I go. Martin will now tell me there is a different way to go. HTH. Phil |
||
| Last edited on 27 Jul 2012 19:01 by Phil O |
|||
|
posted: 27 Jul 2012 23:17 from: Alan McMillan
click the date to link to this post click member name to view archived images |
Hi Phil Thanks for that. I now understand that I need to shove the timbers manually under a turnout. However it does raise the question...if defined custom settings for plain track are not passed on when a turnout is created, what's the point of having the facility to do it? Surely it would make more sense to have the plain track custom settings apply equally to turnouts? After all that's what appears to happen if I pick up the defaults in Templot for any given standard, eg P4 or S7. Alan |
||
|
posted: 27 Jul 2012 23:34 from: Martin Wynne
click the date to link to this post click member name to view archived images |
Alan McMillan wrote: I now understand that I need to shove the timbers manually under a turnout.Hi Alan, I think there's some confusion here. You don't need to do that. If I could grasp exactly what you are trying to do I would make a bit of video for you. I don't understand why you want Swiss flat-bottom plain track with UK REA bullhead switches? Why not create a full custom Swiss turnout template? And then use that for your track planning? regards, Martin. |
||
|
posted: 28 Jul 2012 00:18 from: Alan McMillan
click the date to link to this post click member name to view archived images |
Hi Martin The only reason I used the REA turnout was because it was what showed up by default when I used the New Template menu item. It was only an experiment to ascertain if the modified sleeper spacing I had defined for plain track would percolate down to turnouts. It turned out not to and that was where my original question came from. If I have to create a genuine SBB turnout based on CC switches with FB rail I will, I just needed to know how to get the sleeper spacings under turnouts to be the same as those I had defined for plain track. Alan |
||
|
posted: 28 Jul 2012 01:59 from: Martin Wynne
click the date to link to this post click member name to view archived images |
Alan McMillan wrote:The only reason I used the REA turnout was because it was what showed up by default when I used the New Template menu item.Hi Alan, Ah. Don't use that: 2_272041_440000000.png 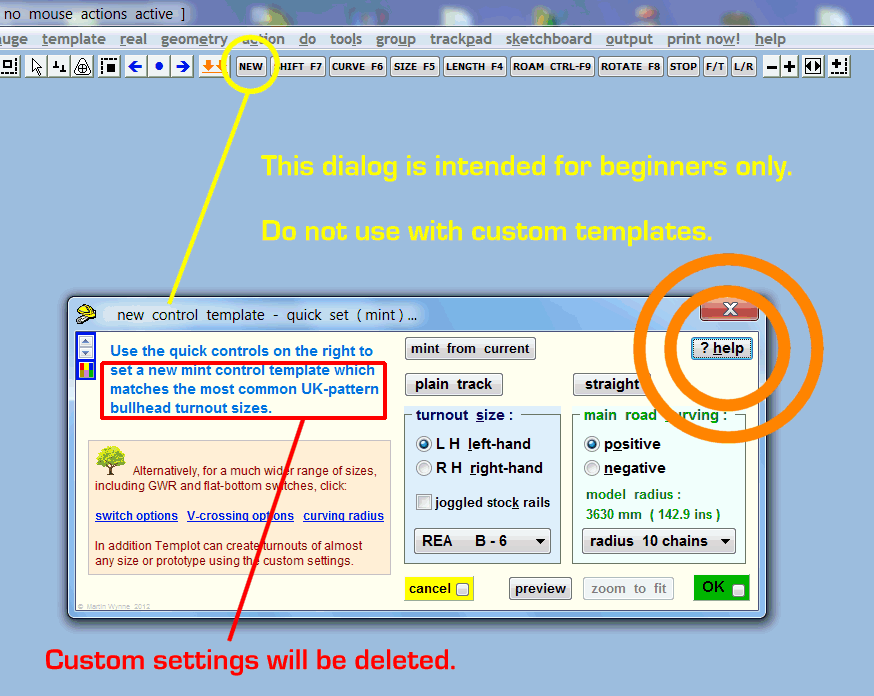 There is a video in this topic showing how to create custom templates. It's years out of date and needs updating for the new features in Templot2. It is for narrow gauge, but the methods are the same for any prototype: topic 376 regards, Martin. |
||
|
posted: 28 Jul 2012 09:24 from: Alan McMillan
click the date to link to this post click member name to view archived images |
Hi Martin Ah now I get it! Thanks for the information on the video...outdated or not it'll give me what I need to do this thing properly. Thank you very much and I'll post the results. Regards Alan |
||
|
posted: 30 Jul 2012 10:37 from: Alan McMillan
click the date to link to this post click member name to view archived images |
Hi Martin I've been working on my SBB turnout and plain track with modified sleeper spacings etc. I have saved the created CC8 as a library template and it's just what I wanted... 412_300532_520000000.png 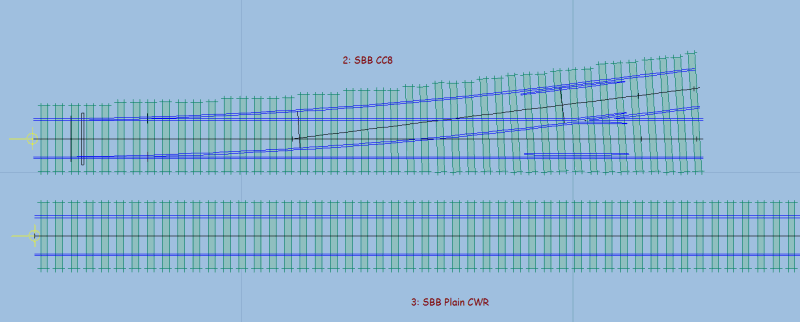 but if I use F5 to enlarge it, this happens... 412_300533_070000000.png 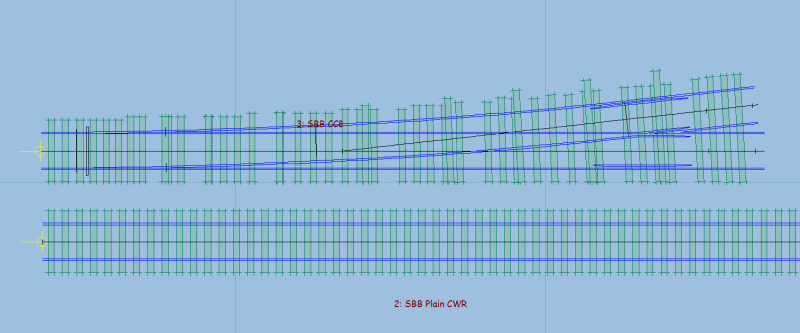 The bonus timbers are left behind it seems. Also if Itake the plain track template and insert a turnout into it, the result is an REA bullhead one with GWR(?) sleeper spacings. How do I get my new settings to be the ones that Templot uses by default? Regards Alan |
||
| Last edited on 30 Jul 2012 10:39 by Alan McMillan |
|||
|
posted: 30 Jul 2012 11:29 from: Martin Wynne
click the date to link to this post click member name to view archived images |
Alan McMillan wrote:The bonus timbers are left behind it seems.Hi Alan, If you want to use F5 on a custom template, you would normally create it without shoved or bonus timbers, using the settings in the real menu only. You should never need a bonus timber for such customizing, your screenshot seems to have added bonus timbers instead of changing the settings for the numbers of timbers spanned at the V-crossing. But if spacings at the V-crossing vary, as for example in GWR crossings, it may be impossible to avoid shoving some of the timbers. In that case you may need to create each size of template separately, and not use F5 on them. Generally mixing F5 with shoved timbers is not recommended. Also if I take the plain track template and insert a turnout into it, the result is an REA bullhead one with GWR(?) sleeper spacings. How do I get my new settings to be the ones that Templot uses by default? First you need to create a plain track template which contains your customized turnout settings: 1. start with your customized turnout template. 2. template > convert to plain track menu item. 3. store it for future use -- store as unused or store as library template menu items. Give it a name which clearly identifies the type of turnout it contains, because that won't be visible as plain track on the screen. When you want to use it in a track plan: 4. copy it to the control template. 5. use this plain track template for your track planning, instead of any others. To insert your customized turnout in it: 6. if it contains shoved timbers -- click the tools > make tools: options > retain shoved timbers menu option. 7. template > insert turnout in plain track menu item. The shoved timbers issue is tricky -- often you won't want to retain the shoved timbers because they were shoved to avoid a conflict in one specific location only. That's why there is an option setting on this, but you have to remember to set it before each make/insert operation. regards, Martin. |
||
|
posted: 30 Jul 2012 17:08 from: Alan McMillan
click the date to link to this post click member name to view archived images |
Hi Martin Thanks for the clarification. I'll play about with it and see how it goes. Regards Alan |
||
|
posted: 30 Jul 2012 21:05 from: Alan McMillan
click the date to link to this post click member name to view archived images |
Hi Martin Sorry, I think I'm being thick. I have created a new custom template using the custom switch option with defined sleeper spacings and no shoved timbers. However, when I convert it to plain track I get British spacings again as seen below. What am I doing wrong? Regards Alan 412_301602_020000000.png 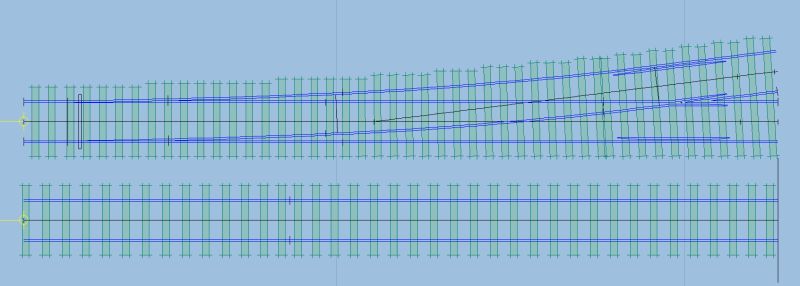 |
||
|
posted: 30 Jul 2012 21:24 from: Martin Wynne
click the date to link to this post click member name to view archived images |
Hi Alan, 1. have your custom turnout settings in the control template. 2. click on a background template which contains the custom plain track settings. 3. on its menu click obtain to the control > obtain plain track spacings menu item. 4. store the new custom template. 5. convert it to plain track. There are other ways, but this is the easiest from where you are now. regards, Martin. |
||
|
posted: 30 Jul 2012 21:39 from: Alan McMillan
click the date to link to this post click member name to view archived images |
Sorry Martin, but I still don't get it. I've gotten to step 3 in your instructions but after that I'm lost. I don't understand how I can store a template that's already on the background. If I make it the control after the [obtain to the control > obtain plain track spacings] process, the plain track doesn't have my custom spacings. Sorry. Regards Alan |
||
|
posted: 30 Jul 2012 21:59 from: Martin Wynne
click the date to link to this post click member name to view archived images |
Hi Alan, 1. have your custom turnout settings in the control template. i.e. click on the upper template in your screenshot and delete to the control. 2. click on a background template which contains the custom plain track settings. i.e. find a background template which already contains your custom plain track spacings. I assumed you have one, or can add one from a .box file. It doesn't matter whether it is a plain track template or a turnout template with some approach or exit track, provided the plain track it contains is using your custom plain track settings. 3. on its menu click obtain to the control > obtain plain track spacings menu item. This copies the custom plain track settings from the background template to the control template. You now have a control template which contains your custom turnout settings, AND the custom plain track settings. You won't actually see the plain track unless you extend some approach track or exit track. 4. store the new custom template. i.e. store that control template as your new custom template with ALL your settings. When you want to use it in track planning, copy it to the control template. If you want a plain track template, 5. convert it to plain track. It doesn't actually matter whether you store it as a plain track template and insert a turnout in it when wanted, or store it as a turnout template and convert it to plain track when wanted. The important thing is that it contains ALL your custom settings either way. regards, Martin. |
||
|
posted: 31 Jul 2012 10:10 from: Alan McMillan
click the date to link to this post click member name to view archived images |
Hi Martin Thanks for that further clarification. It now works perfectly and F5 can also be used to take what I've got to a CC9. All I have to do now is the same thing for the CD10 and CE12 turnouts and then I can start planning! Thanks for all your help...it's further proof that Templot is the dog's doughnuts. Regards Alan |
||
|
posted: 31 Jul 2012 13:23 from: Alan McMillan
click the date to link to this post click member name to view archived images |
Hi Martin Just one more matter arising. Having created a diamond with one of my now spot on SBB custom turnouts, I noticed that the sleeper spacing near the K crossing was not showing correctly. Can I remedy this in a manner similar to defining the spacings under a custom switch? 412_310820_520000000.png 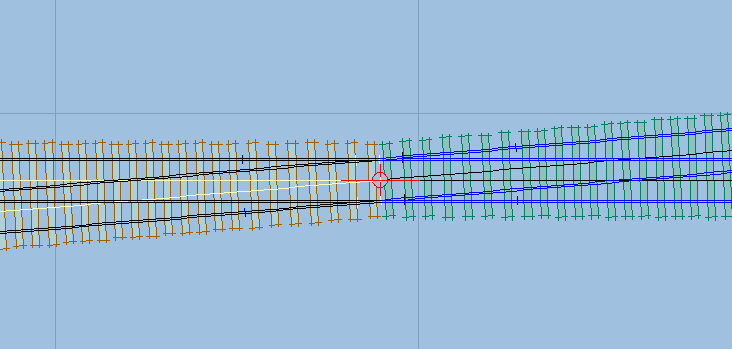 Regards Alan |
||
|
posted: 1 Aug 2012 10:31 from: Martin Wynne
click the date to link to this post click member name to view archived images |
Hi Alan, At present there is no function to create custom timbering for a K-crossing. The default settings are based on UK practice. If you need customized timbering it can only be done using the shove timbers functions. The issue is all a bit muddy because a K-crossing can be timbered correctly only if you are using an exact-scale track standard such as P4, S7, etc. If you are using wider than scale flangeways in 00, EM, etc., the timbering should be changed to a non-prototypical arrangement so that the tips of the K-crossing point rails are supported on a timber and not in fresh air between the timbers. There is an option setting to control this: real > timbering > half-diamond timbering > timbering as prototype / timbering as model menu options. regards, Martin. |
||
|
posted: 1 Aug 2012 10:51 from: Alan McMillan
click the date to link to this post click member name to view archived images |
Thanks Martin, it's no great bother to do some timber shoving since there aren't that many to do. At least now I've got the turnouts and plain track set up. Thanks again for your help. Regards Alan |
||
|
posted: 1 Aug 2012 11:28 from: Martin Wynne
click the date to link to this post click member name to view archived images |
Hi Alan, There is a trick you can use which may help a bit: real > K-crossing options > customize K-crossings > K-crossing wing rails... menu item. This controls the position of the rail joint in the wing rails (the outer rails at a K-crossing), and hence the adjacent timbering. If you set this to 0 (zero), and then omit all the conflicting K- numbered timbers using shove timbers, you will have your custom timber spacing all the way to the centre. You can then shove those as necessary. You may even find a setting for that rail joint which creates your desired result. regards, Martin. |
||
|
posted: 1 Aug 2012 11:50 from: Alan McMillan
click the date to link to this post click member name to view archived images |
That's great Martin, thanks for the hint...it does the job very nicely! Regards Alan |
||
|
posted: 1 Aug 2012 19:31 from: Alan McMillan
click the date to link to this post click member name to view archived images |
And here's the proof! A 1 in 8 crossing with the K crossing wing rail setting wound down to zero. With the removal of the extra timbers and the shoving of one or two others, this is the result... 412_011424_130000000.png  Perfect! Thanks Martin. Alan |
||
| Please read this important note about copyright: Unless stated otherwise, all the files submitted to this web site are copyright and the property of the respective contributor. You are welcome to use them for your own personal non-commercial purposes, and in your messages on this web site. If you want to publish any of this material elsewhere or use it commercially, you must first obtain the owner's permission to do so. |