Templot Club Archive 2007-2020
|
|||
| author | remove search highlighting | ||
|---|---|---|---|
|
posted: 16 Mar 2014 16:42 from: Adrian (ffoil)
click the date to link to this post click member name to view archived images |
I'm trying to build a double slip, and using the video tutorial so far I've managed to create a single slip. Where I'm having problems is putting the other side in. What ever I do with the peg position, I seem to end up recreating the single slip (two on top of each other). What snap options should I be selecting ? Adrian |
||
|
posted: 17 Mar 2014 10:21 from: Alan Turner
click the date to link to this post click member name to view archived images |
For the second slip where it says MS use TS and MS for TS. Alan |
||
|
posted: 17 Mar 2014 13:27 from: Martin Wynne
click the date to link to this post click member name to view archived images |
Adrian (ffoil) wrote:What snap options should I be selecting ?Hi Adrian, As Alan suggested, simply swap sides: 2_170818_500000000.png 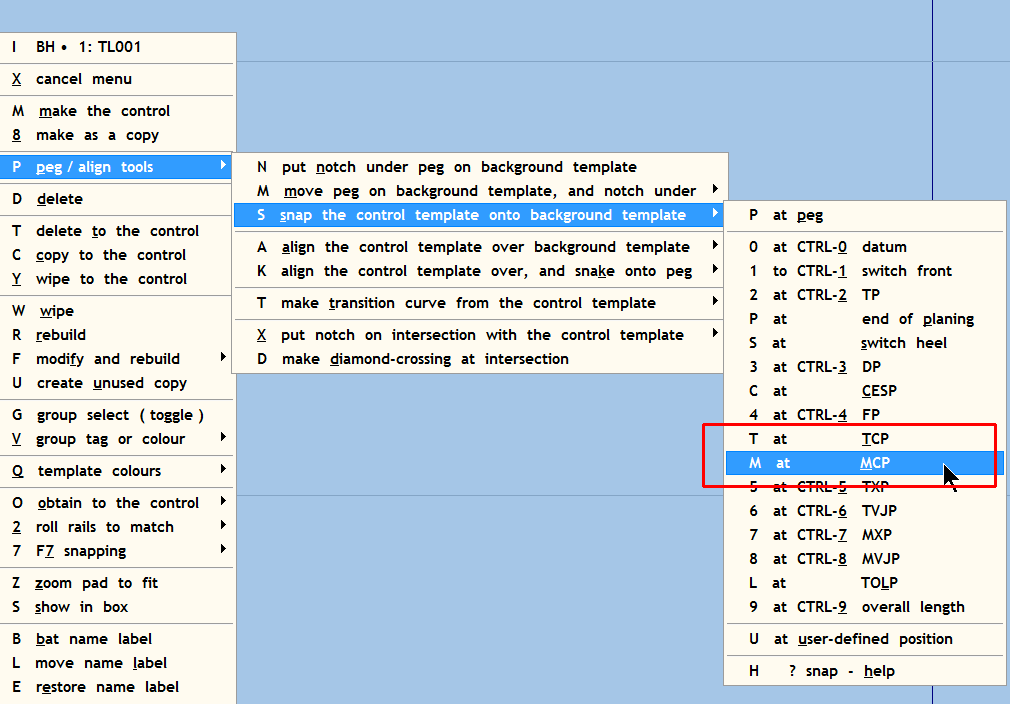 For the first slip road you use TCP on one half-diamond, and MCP on the other one, to snap the slip switches into position. For the second slip road, use MCP and TCP respectively instead. If the double-slip is on a curve, you will probably need to adjust the switch curving (F6) to match the underlying template. And also change the hand of the switch as required of course (CTRL+X). regards, Martin. |
||
|
posted: 17 Mar 2014 21:55 from: Adrian (ffoil)
click the date to link to this post click member name to view archived images |
Thanks for the suggestions. I've been playing around with this for over an hour, and I'm not sure if I'm moving forwards or not. I thought I had it, but when I tried to delete the spare turnout, I ended up back with a single slip. I then tried to start again (going back to what I'd saved yesterday), and now whilst I appear to have 4 tie bars, I don't appear to have a double slip. I can't see where I should lengthen/curve my rails to, and I appear to have a stack of templates superimposed upon each other. Adrian |
||
|
posted: 18 Mar 2014 01:42 from: Brian Nicholls
click the date to link to this post click member name to view archived images |
Hi Adrian, From your last message, if you have 4 tie bars in, shall we say, more or less the right places, then this should mean, you have the 4 switches in place. Now if that is so, then all you should need to do is select one of the switches (tie bars) that does not have a slip road, and put it to the control, and then in the menu bar at the top select < tools >, then in the drop down menu select < make slip road >. This should then attach a slip road to that switch. All you need to do then is to use a combination of < F4 > to get the right length of the slip road, and then < F6 > to get the right curving to fit onto the other switch at the other end of that slip road pair. Hope this helps. All the best, Brian. |
||
|
posted: 18 Mar 2014 12:15 from: Martin Wynne
click the date to link to this post click member name to view archived images |
Hi Adrian, The pre-set slip switches are intended to be snapped onto the Crossing Positions (CP). MCP is on the Main-road centre-line, opposite the Fine Point (gauge intersection, FP). TCP is on the Turnout-road centre-line, opposite the Fine Point. There are full details of all these peg positions at: http://templot.com/martweb/gs_geometry.htm#peg_positions Each slip road links one MCP to one TCP: 2_180708_290000000.png 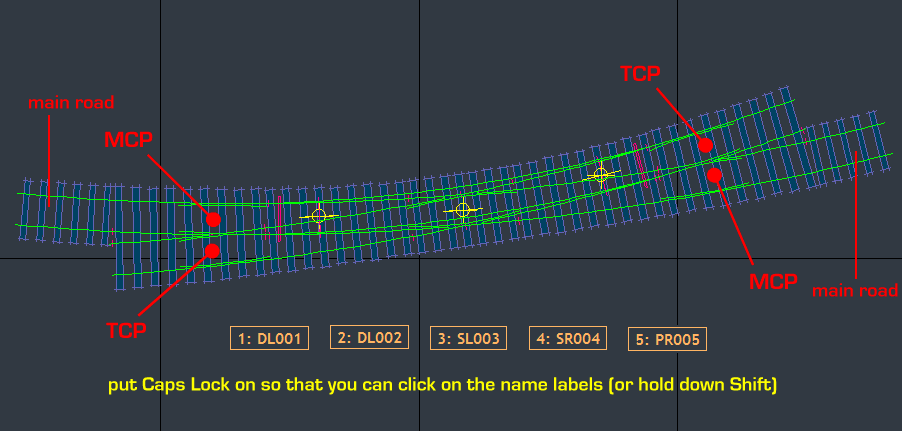 I will post a bit of video shortly showing how to add the second slip road. regards, Martin. |
||
|
posted: 18 Mar 2014 22:05 from: Adrian (ffoil)
click the date to link to this post click member name to view archived images |
Hi Martin and Brian, Thanks for the hints. I think I've now got it. I've been able to place the other side of the slip into place after some messing about, and I've got rid of the extra templates (I like the shift mouse thing, very useful). The next challenge is the K sections. All four ends of the angled bits (if that makes sense) over lap the inside switch rails (I think I've got the terminology right) 2341_181700_460000000.png 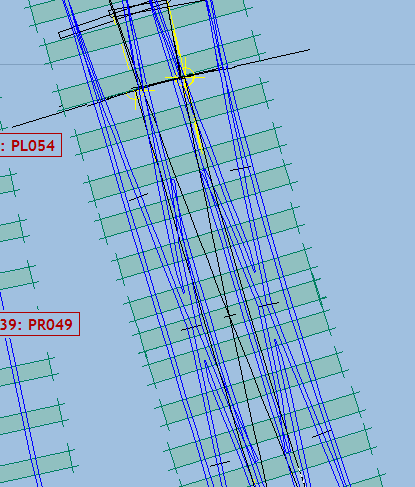 What are the magic incantations to get around that ? Adrian |
||
| Attachment: attach_1784_2424_double_slip.png 438 | |||
|
posted: 18 Mar 2014 22:18 from: Martin Wynne
click the date to link to this post click member name to view archived images |
Adrian (ffoil) wrote:What are the magic incantations to get around that ?Hi Adrian, Delete one half-diamond to the control. real > adjust check rails menu item. Click the ? help button on there for details. Reduce the flare length and rail length for each check rail end, and change it to machined flare. Store the template, then repeat for the other half-diamond. regards, Martin. |
||
|
posted: 22 Mar 2014 15:30 from: Adrian (ffoil)
click the date to link to this post click member name to view archived images |
Thanks for that, apologies for not replying sooner, a busy second half to the week. I've now got a double slip, and no bit of rail overlaps any other bit of rail An observation (definitely not a complaint). Whilst the two inside switch rails are shown as tapered, and have the planning lengths shown (as I would expect), the outer rails (the slip rails) appear to taper down (I would expect them to be of constant thickness), whereas the original rails from the diamond are solid (I would expect them to be tapered, and have the planning length shown). Is this normal ? I'm sure I can work out the planning lengths when I build it. Three more tasks now remain.
|
||
|
posted: 22 Mar 2014 17:58 from: Martin Wynne
click the date to link to this post click member name to view archived images |
Adrian (ffoil) wrote:An observation (definitely not a complaint). Whilst the two inside switch rails are shown as tapered, and have the planning lengths shown (as I would expect), the outer rails (the slip rails) appear to taper down (I would expect them to be of constant thickness), whereas the original rails from the diamond are solid (I would expect them to be tapered, and have the planning length shown).Hi Adrian, For a neat result in the output, the switch templates need to overwrite the half-diamond templates. To make that happen, re-order the templates so that the half-diamond templates are above the switch templates in the storage box (i.e. have lower list numbers on the left): 2_310713_080000000.png 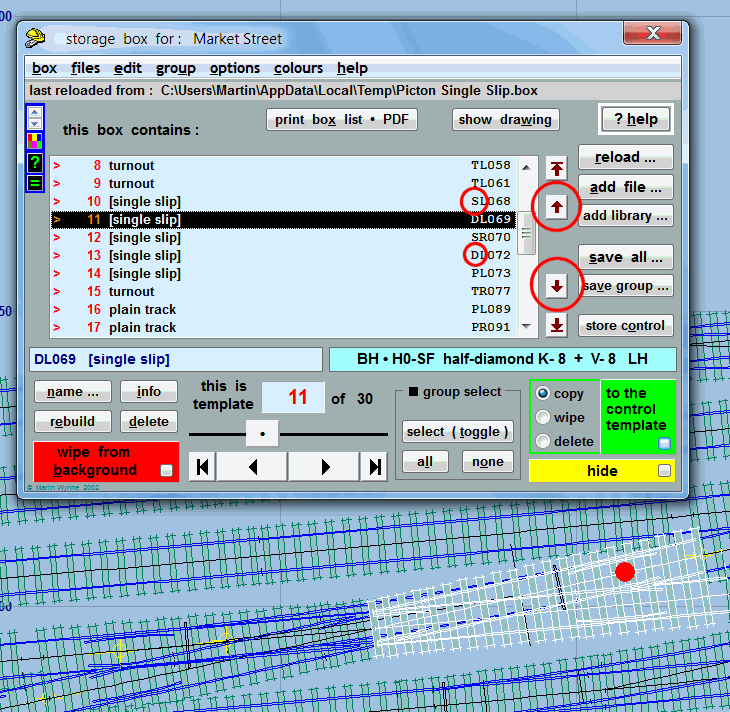 Use the brown up/down arrows to move the templates with a D prefix above the templates with a S prefix. I need to work out which bits of rail need to be (electrically) bonded to each other, and which bits need to be switched (and hence isolated).The rules are the same as for all track formations -- all V-crossings need to be isolated from the surrounding rails and have their polarity switched. K-crossings do not need to be isolated or switched. In the case of a slip, single or double, the V-crossings are switched by the points at the opposite end: 2_221250_560000000.png 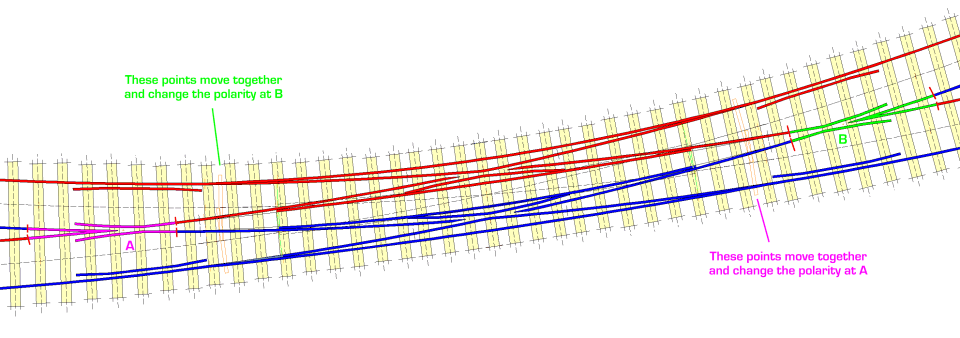 I've just noticed that one of the turnouts that leads into the DS is shown as having too tighter radius, so I need to straighten that out a bit. Is there any easy way of reattaching the other templates to it afterwards (assuming the geometry works out)Yes, use the group notch linking functions. If you post your .box file here I can explain properly. regards, Martin. |
||
|
posted: 23 Mar 2014 15:04 from: Adrian (ffoil)
click the date to link to this post click member name to view archived images |
Martin Wynne wrote:For a neat result in the output, the switch templates need to overwrite the half-diamond templates. To make that happen, re-order the templates so that the half-diamond templates are above the switch templates in the storage box (i.e. have lower list numbers on the left): Hi Martin, Again, many thanks for your assistance. As suggested, I've changed the template order, and that works much better. Attached is the box file. The template that has too tighter a radius will probably come up as the current one when you open it, but it should be template TL076. Adrian |
||
| Attachment: attach_1789_2424_figworthy_2014_03_23_1347_39.box 251 | |||
|
posted: 23 Mar 2014 16:28 from: Martin Wynne
click the date to link to this post click member name to view archived images |
Hi Adrian, If you change that turnout to a B-8 with a curviform V-crossing, it is a near-perfect fit without needing to move the slip and remaining tracks. I changed the top turnout to a B-7 to get an easier radius in the top curve. Control template is a copy of it: 2_231120_380000000.png 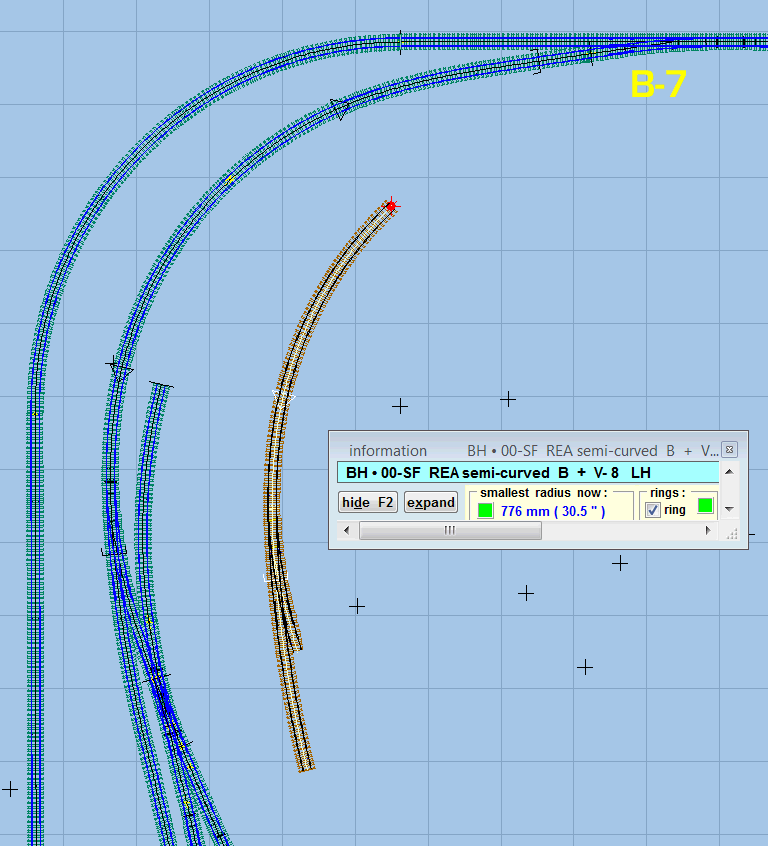 .box file attached below. regards, Martin. |
||
| Attachment: attach_1790_2424_figworthy_for_adrian.box 261 | |||
|
posted: 23 Mar 2014 20:32 from: Adrian (ffoil)
click the date to link to this post click member name to view archived images |
Hi Martin.Hi Adrian,Many thanks, I'll have a look during the week. Adrian |
||
|
posted: 25 Mar 2014 20:44 from: Adrian (ffoil)
click the date to link to this post click member name to view archived images |
Martin Wynne wrote: Hi Adrian,Again, many thanks. I've had time to have a look at it, and it does drop in nicely, so it is now in place. Next job (with this anyway) will be to start sorting out the timbering. Adrian |
||
| Please read this important note about copyright: Unless stated otherwise, all the files submitted to this web site are copyright and the property of the respective contributor. You are welcome to use them for your own personal non-commercial purposes, and in your messages on this web site. If you want to publish any of this material elsewhere or use it commercially, you must first obtain the owner's permission to do so. |