Templot Club Archive 2007-2020
|
|||
| author | remove search highlighting | ||
|---|---|---|---|
|
posted: 6 Jan 2018 13:43 from: Martin Wynne
click the date to link to this post click member name to view archived images |
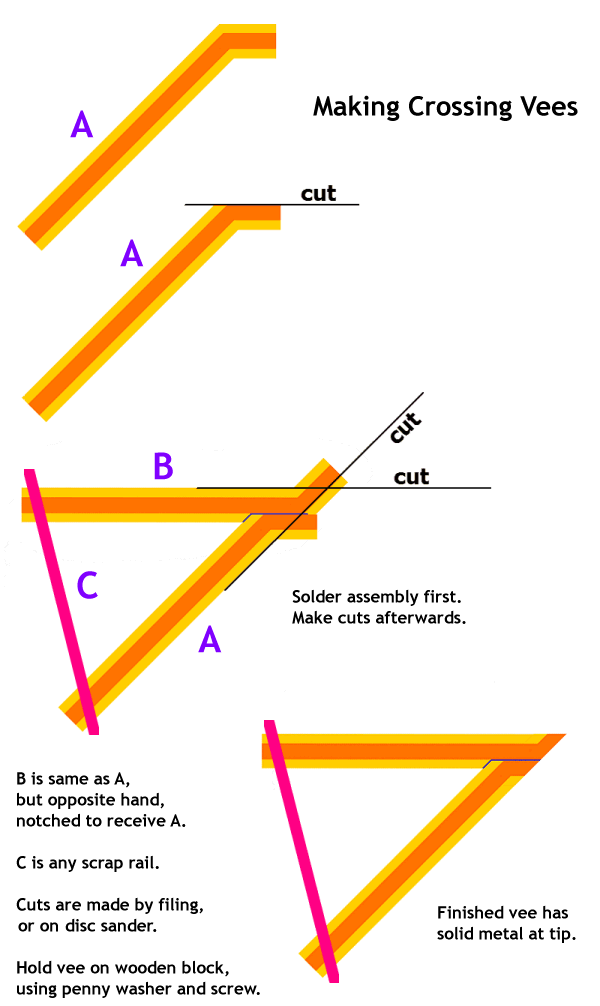
Here is a reply I have just posted on RMweb. It's old stuff I have posted here before, but not for several years. It is much easier to file a vee after assembling it. Even easier if you use a disc sander. This shows how a vee can be constructed to any angle matching the template, without needing filing jigs, and finishing with solid metal at the nose. I have greatly exaggerated the crossing angle for clarity. The rails are shown in cross-section along the rail -- yellow shows the rail head and foot, orange shows the web of the rail: 2_060749_540000000.png  Make sure you have both rails the right way up. Bullhead rail has the thicker part at the top. A is a prepared piece of rail with the end bent to the crossing angle, or slightly less. Allow a little extra on the overall length. Then file it as shown to become the splice rail. Make another one of the opposite hand as B, to become the point rail (nose). No need to file the end yet, but file a notch in it to receive A as shown. The filing does not need to be very accurate. C is any scrap bit of rail or etched kit waste, soldered on top of the rail for stability while handling. Unsolder or cut off after installing the vee in the turnout, and then the surplus vee rail ends are trimmed back as required. Hold the rails down on the edge of a small block of wood using a penny washer on top and a screw. Stick a bit of printed template on the block as a guide. If you don't have a penny washer to hand you can drill a hole in an old coin. Assemble as shown using high-temperature solder because the rail gets hot while sanding. Using high-temp solder also reduces the risk of it coming apart later if you are using soldered track construction. The washer may get sanded along with the rail, but no matter. Turn the vee round or over to make the second cut. The result is as shown after making two cuts on the sander. If it gets hot stop and dip it in a jar of cold water. If necessary the bulk of the metal can be quickly removed with a coarse file or metal shears before finishing on the sander. The end result is an accurately aligned vee comprised of solid rail at the nose. All that then remains is to fettle the running edges at the tip and blunt back the nose. It's a good idea to take a few thou off the top of the nose so that it dips down slightly below the wing rails. This allows for the coning angle on the wheels as they run off the wing rail onto the nose, producing smoother running. Don't overdo it. N.B. Wear a mask while sanding and wash hands afterwards. The sandings will contain lead from the solder. Far East-quality disc sanders are available at lowish cost and very useful for other workshop jobs: sander1.jpg  Hope this helps. regards, Martin. |
||
|
posted: 6 Jan 2018 14:18 from: wcampbell23
click the date to link to this post click member name to view archived images |
Hi Martin Best wishes for the New Year and thanks for posting this again. I had been thinking about this method a few days ago and was trying to remember where I had seen it before. Just the thing for a project coming up that involves a number of 1 in 9 vees. Thanks. Bill Campbell. |
||
|
posted: 6 Jan 2018 22:40 from: Rob Manchester
click the date to link to this post click member name to view archived images |
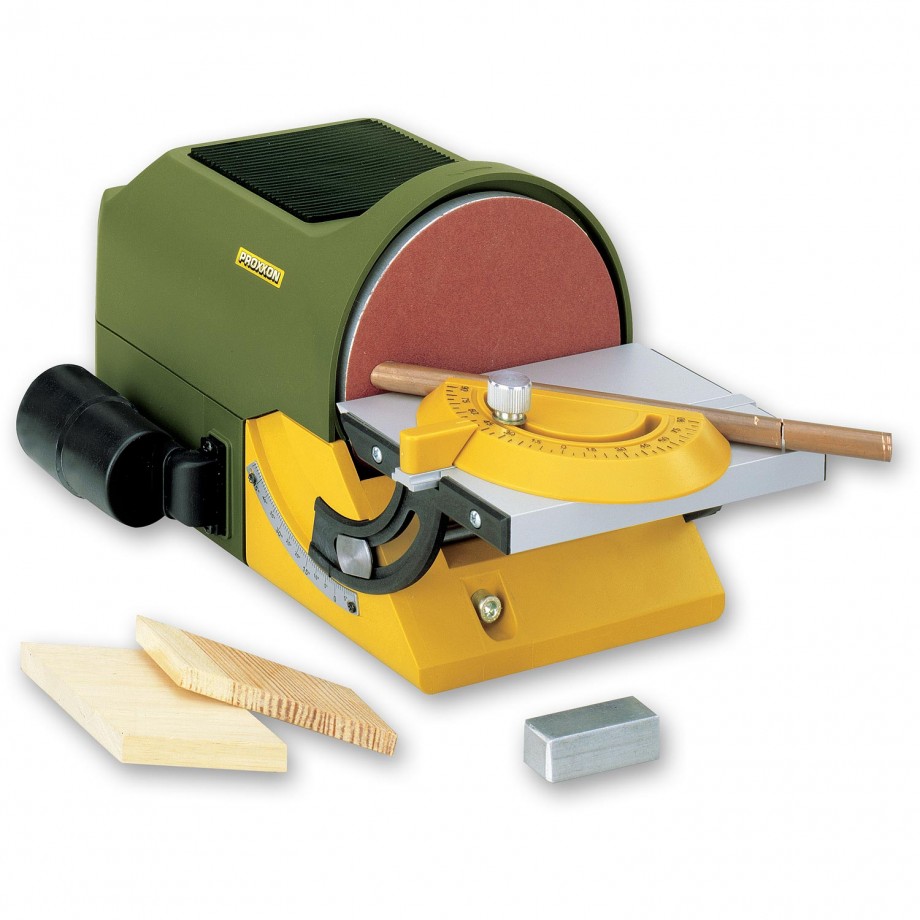
Hi Martin, Yes, I have one of those sanders in the woodwork kit except it is blue with a different 'makers' name on it. I also have one of these :- 210577_xl.jpg  It is a Proxxon TG 125/E and is excellent for more delicate modelling tasks. It is variable speed and just hums quietly when in use. About £160 now I think. Good method for the crossing vees Martin. You can of course make an adjustable jig for holding the assembly on the disc sander table if you wish. Rob |
||
|
posted: 7 Jan 2018 10:51 from: John Palmer click the date to link to this post click member name to view archived images |
I have the Scheppach version of these disc/belt sanders and can also attest to how useful they are. I got acceptable results from the disc sander as a grinder of the backs of switch blades, using an easily fabricated hardwood jig with clamping screw to present the rail to the disc. |
||
| Please read this important note about copyright: Unless stated otherwise, all the files submitted to this web site are copyright and the property of the respective contributor. You are welcome to use them for your own personal non-commercial purposes, and in your messages on this web site. If you want to publish any of this material elsewhere or use it commercially, you must first obtain the owner's permission to do so. |