Templot Club Archive 2007-2020
|
|||
| author | remove search highlighting | ||
|---|---|---|---|
|
posted: 8 Aug 2020 16:08 from: ikcdab
click the date to link to this post click member name to view archived images |
So i am to make a movesble diamond.See picture. The two vees are 1 in 8.75 and 1 in 12.02. On the 1 in 8.75 side, I can only get 5 standard slide chairs in before they "run out". Is that OK for the switch blade to be flexible enough? If not, how do I do it? Thanks! 1588_081058_140000000.jpg 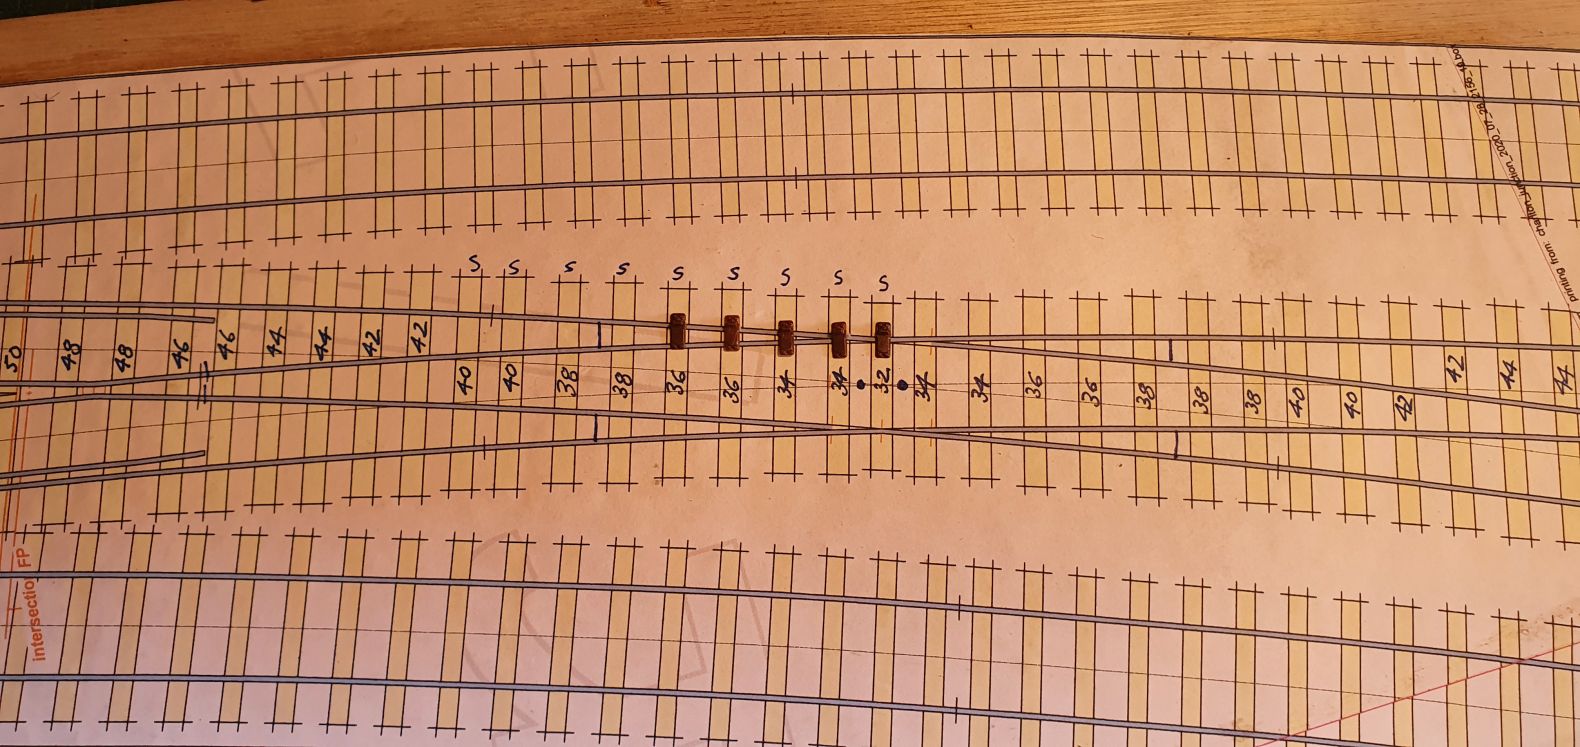 |
||
|
posted: 8 Aug 2020 19:12 from: wcampbell23
click the date to link to this post click member name to view archived images |
Hi - you don't state which scale, gauge, rail type and make of chairs you are working with - that would be a help with advice. Not every manufacturer's slide chairs are the same size - some have a deeper slide area. The simple work-around is to use two slide chairs where a deeper slide area is needed. Trim the chair against the rail as far out from the rail as possible but just before the moulded bolt heads. Cut the rail end from another slide chair and butt join the remaining slide section on to the first chair. Been there - done that! Don't throw away the spare "rail ends" from the second slide chair - keep these to cosmetically represent the chairs at the common crossing. P.S. Just had a thought - the switch rail ends seem to share a single slide chair on a single timber - I don't think that would represent prototype practice - it would be worth doing a little research on the timbering and slide chair arrangements for the railway company your track is representing. Regards. |
||
| Last edited on 8 Aug 2020 19:16 by wcampbell23 |
|||
|
posted: 8 Aug 2020 19:22 from: ikcdab
click the date to link to this post click member name to view archived images |
wcampbell23 wrote: Hi - you don't state which scale, gauge, rail type and make of chairs you are working with - that would be a help with advice.Sorry, I forgot to state the obvious. But to be honest its a generic question.Anyway, its 16.5mm, 4mm. C&l rails and chairs. Its more a question about prototype practice, I am sure that the full size railwsy had the same question. Also, with a bullhead diamond, it is right that the tips both share the same sleeper. I'm sure I've read that on this forum somewhere.... |
||
|
posted: 8 Aug 2020 19:33 from: ikcdab
click the date to link to this post click member name to view archived images |
wcampbell23 wrote: Hi - you don't state which scale, gauge, rail type and make of chairs you are working with - that would be a help with advice.Ok I found out. Here is the diagram showing the bullhead tips sharing the same timber...http://www.rmweb.co.uk/community/index.php?/topic/103298-western-region-k-crossing-vs-double-slips/&do=findComment&comment=2035374 |
||
|
posted: 8 Aug 2020 20:20 from: Paul Boyd
click the date to link to this post click member name to view archived images |
As far as GWR prototype practice goes (you don’t mention your prototype), Smith’s track “bible” shows a 1 in 9 “moveable crossing” where both switches end on a common central timber, but that timber is 16” wide with a special double slide chair. It also shows special slide chairs covering five timbers, plus the common, as well as the support rail for the switch rail. However, that was pre-1938, after that it seems they used two central timbers, each with its own slide chair. That’s possibly all irrelevant though if you’re not modelling GWR or BR(W)! Unfortunately, copyright means I can’t share the diagram here. |
||
|
posted: 8 Aug 2020 20:28 from: ikcdab
click the date to link to this post click member name to view archived images |
Paul Boyd wrote: As far as GWR prototype practice goes (you don’t mention your prototype), Smith’s track “bible” shows a 1 in 9 “moveable crossing” where both switches end on a common central timber, but that timber is 16” wide with a special double slide chair. It also shows special slide chairs covering five timbers, plus the common, as well as the support rail for the switch rail. However, that was pre-1938, after that it seems they used two central timbers, each with its own slide chair. That’s possibly all irrelevant though if you’re not modelling GWR or BR(W)!Many thanks for that. I'm aiming for southern 1950s to 1960s. I wonder if that is different. |
||
|
posted: 8 Aug 2020 20:33 from: Martin Wynne
click the date to link to this post click member name to view archived images |
Here is the REA/SRC drawing of a 1:12 switch diamond. In this case the middle timber is 14" wide. Low res: 2_081530_450000000.png 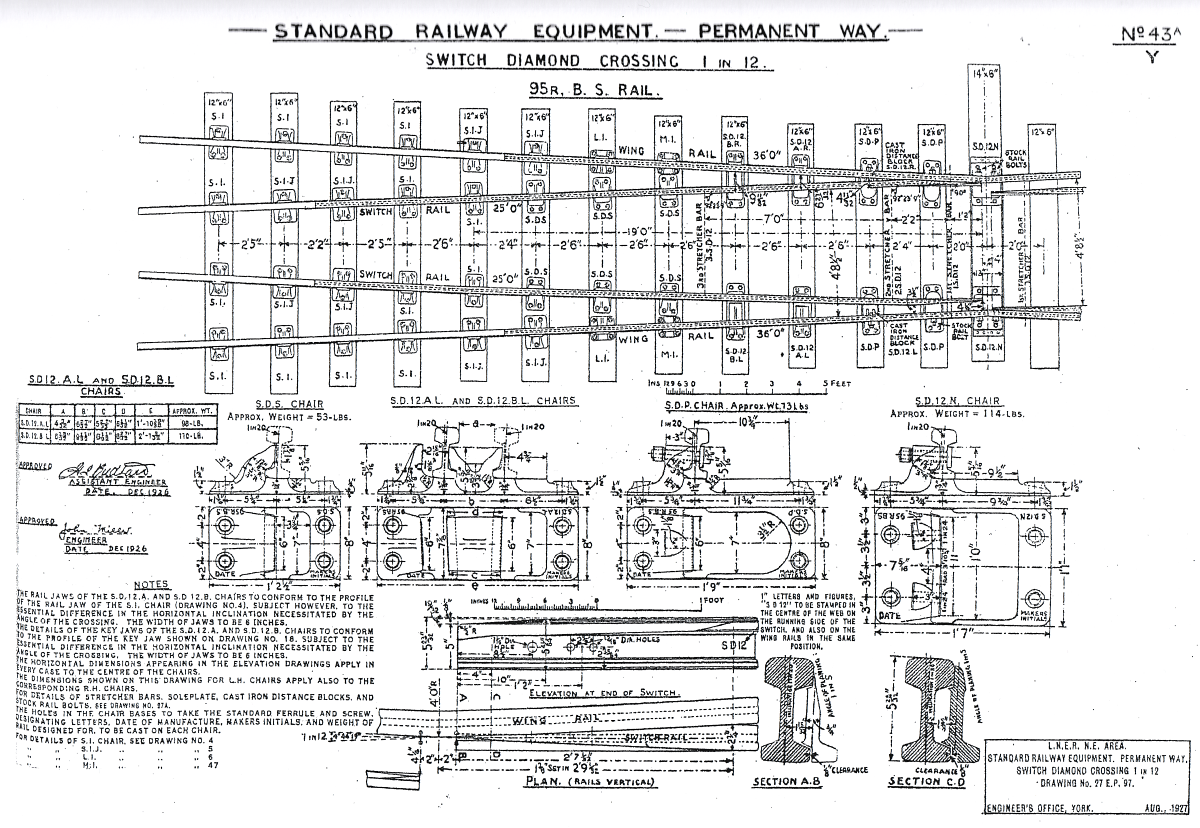 2_081531_110000000.png 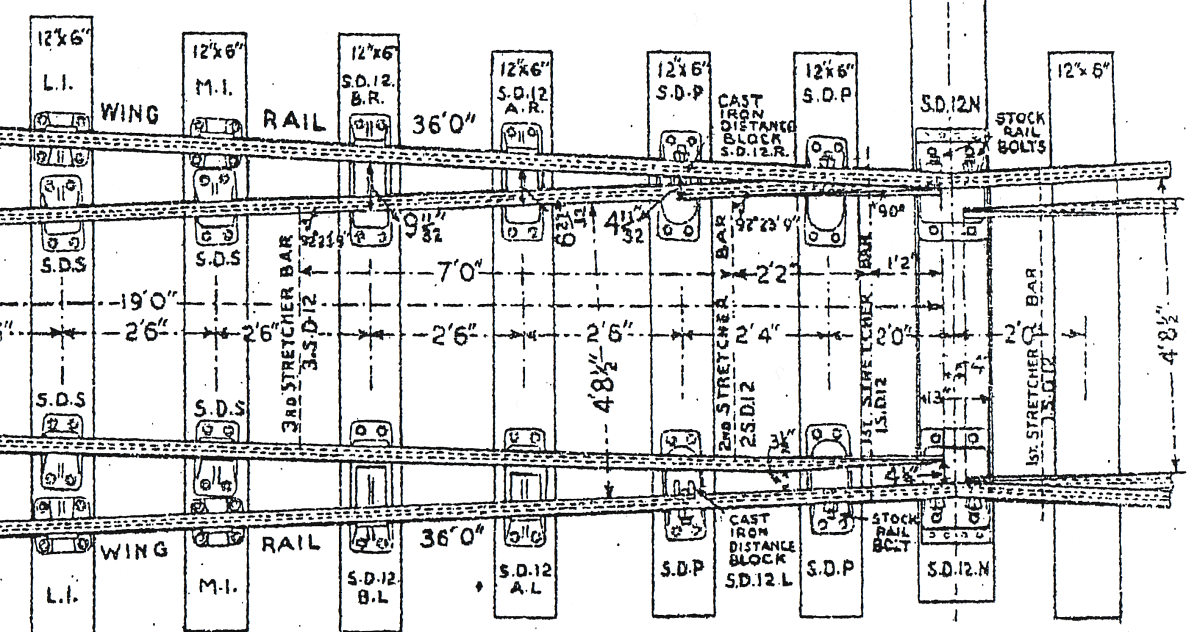 The full hi-resolution scan is at (right-click, Save Link As...): http://templot.com/info/rea_src_12_switch_diamond.png cheers, Martin. |
||
|
posted: 8 Aug 2020 20:40 from: Phil O
click the date to link to this post click member name to view archived images |
That looks like a job for Modelu, if someone could lay their hands on the appropriate chairs and get them to Modelu for scanning. Other 3d printers may be available. Cheers Phil. |
||
| Last edited on 8 Aug 2020 20:41 by Phil O |
|||
|
posted: 8 Aug 2020 21:10 from: Nigel Brown click the date to link to this post click member name to view archived images |
Depending on how amenable C&L chairs are to cutting up, it may be possible to cut 1/3 off a couple of chairs then glue them together, to create to wider slide chair. Nigel |
||
|
posted: 8 Aug 2020 23:30 from: ikcdab
click the date to link to this post click member name to view archived images |
Martin Wynne wrote: Here is the REA/SRC drawing of a 1:12 switch diamond. Martin, many thanks, excellent.Ian |
||
|
posted: 9 Aug 2020 09:06 from: Hayfield
click the date to link to this post click member name to view archived images |
Somehow in trying to answer this thread I contributed to another on a different forum Ikcdab There is here a case in building a model to perhaps not follow the prototype exactly (as the special chairs required are not available) and use a method which works in model form You must decide the optimum length of slide rail which is allowed to move, making the switch rail flexible enough for the operating system you are using. The plan shown by Mick shows a hinged switch blade. Looking carefully the plan there are 5 slide chairs, (a double followed by a normal slide chair, then 3 special chairs (where the stock rail is held in place and the switch rail slides)) If I were making this crossing I would have 6 or 7 slide type chairs on a flexible switch rail, but I would look to support the stock rail as soon as possible. The center timber is a 16" timber made from 2 sleepers joined side by side and I would make double slide chairs by splicing standard ones together side by side The next timber to the center one I would use a standard slide chair The following slide chairs I would try and make a special slide chairs by using a standard slide chair suitably trimmed on the inside and a slide chair slide plate (outside part cut off) trimmed if necessary. I think this would be needed for the next 3 positions The next 2 timbers I would try and use standard slide chairs on the switch rails and standard chairs on the stock rails Whilst not fully prototypical I think it would give me the correct balance between following prototypical practice verses packability in model form |
||
|
posted: 9 Aug 2020 09:20 from: ikcdab
click the date to link to this post click member name to view archived images |
Hayfield wrote: Somehow in trying to answer this thread I contributed to another on a different forumHi Hayfield. Thanks that's helpful. You have seen my contributions on rmweb so I have probably confused things by posting on two forums.I have now cut the wide central sleeper which I see is longer too. I'm going to start a property thread on rmweb at some point. Thanks again |
||
|
posted: 9 Aug 2020 16:07 from: Hayfield
click the date to link to this post click member name to view archived images |
If you look carefully on the plan after the slide chairs there are M1 (small chair) and L1 (chairs) Both in the Exactoscale range, the L1 (along with J Chairs) are included on the new C&L sprues 982_091108_020000000.jpg 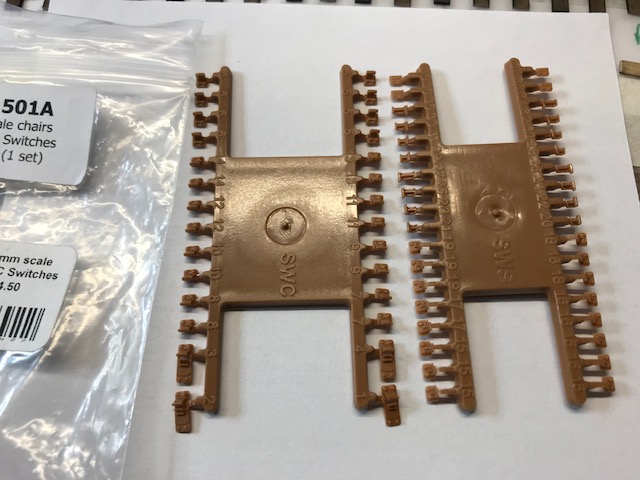 Where I was referring to the chairs made up from splicing a standard and slide chair together, if you look at the bottom of the left hand sprues you will see what I am trying to replicate 982_091109_290000000.jpg 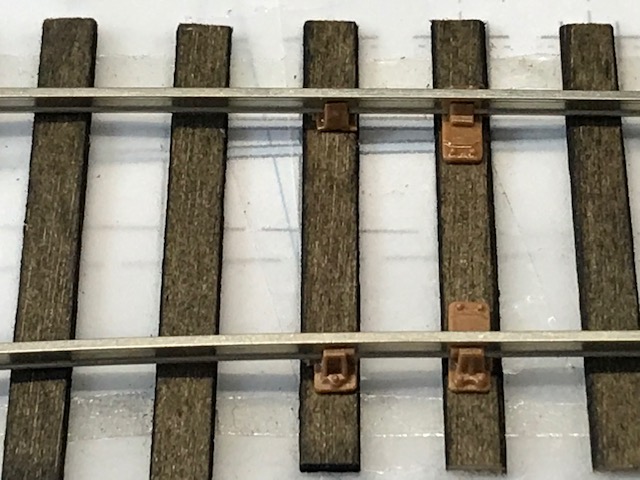 I am building a trailing crossover, there is a better view of the PL1 chairs, the cut up chair next to it is the start of what I was describing, a standard chair trimmed back waiting for the cut back slide chair slide plate |
||
| Last edited on 9 Aug 2020 16:14 by Hayfield |
|||
|
posted: 9 Aug 2020 16:36 from: Martin Wynne
click the date to link to this post click member name to view archived images |
Thanks John. Notice the heavier S1J joint chairs adjacent to all the joints (and the closed-up timber spaces): 2_091131_410000000.png  Joint chairs were quite common within pointwork, so it's great that they are now available from C&L. They are not shown on the Exactoscale templates (as far as I know?) and not available in the Exactoscale range, so they have tended to be forgotten by modellers. cheers, Martin. |
||
|
posted: 9 Aug 2020 20:45 from: Hayfield
click the date to link to this post click member name to view archived images |
A bit off topic, Phil at C&L has invested in a new 7mm scale 3 bolt chair in the same format as 4mm scale 10 x S1 chairs, 2 x J chairs, 2 x L1 chairs and 2 fishplates (H section). Test shots were successful, will be in production very soon A few more new items are in the pipeline, but can't say too much at the moment |
||
| Please read this important note about copyright: Unless stated otherwise, all the files submitted to this web site are copyright and the property of the respective contributor. You are welcome to use them for your own personal non-commercial purposes, and in your messages on this web site. If you want to publish any of this material elsewhere or use it commercially, you must first obtain the owner's permission to do so. |